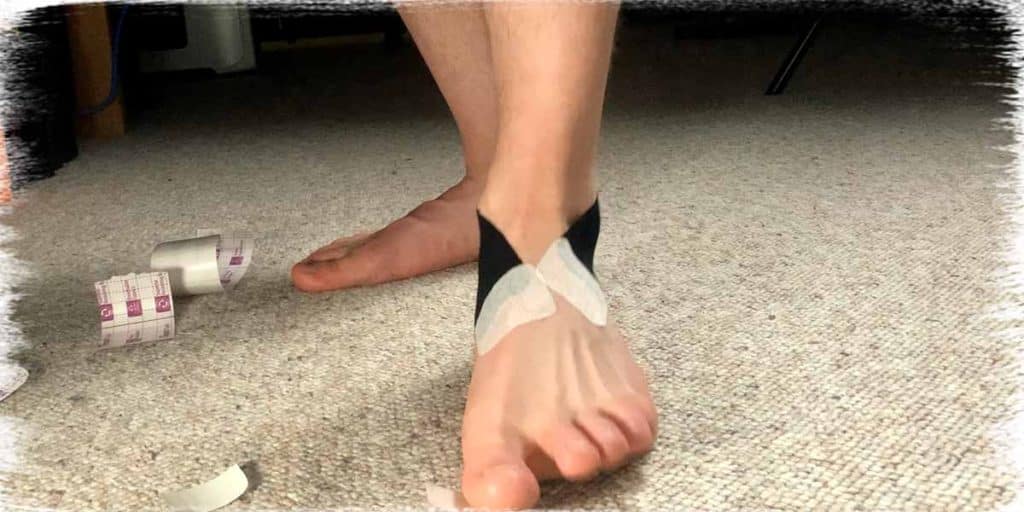
With winter now mostly behind us, I’ve been getting back to my regular morning jogging routine through the neighborhood. And while getting outdoors again and experiencing the warmer weather has made my spirits quite happy, the same can’t be said for my left Achilles tendon. The poor guy has been getting a little sore as I get back into my jogging routine.
While there are many different ways to K-tape your Achilles tendon, the easiest and best way to do so by yourself involves following the steps and pictures in this blog post. This will maximize effectiveness for reducing soreness and discomfort, helping you to feel better much quicker.
If you want to have confidence in knowing that you’ve Kinesio-taped (K-tape) your Achilles’ tendon effectively and want to learn how straightforward of a process it can be, then be sure to keep on reading. This article will walk you through everything you’ll need to know and do in a step-by-step process.
Keep in mind that there are numerous ways one can effectively K-tape their Achilles tendon. The way that I demonstrate in this article is one of my preferred techniques for most circumstances, including times where easy and self-applied taping is needed. The key to K-taping (Achilles or otherwise) is to follow general principles (discussed below). If you adhere to these principles, the rest of the taping application is essentially up to you. As I always like to say, taping is half science and half art.
ARTICLE CONTENTS
(Click/tap on any of the following headlines to instantly jump to that section of the article!)
What you’ll need
Taping principles you should try to follow
The taping process
Bonus: Making sure your tape sticks!
The scientific findings of K-tape
Related Article: The Seven Best Ways to Massage Your Calf Muscles all by Yourself
Disclaimer: While I am a physical therapist, I am not YOUR physical therapist. As a result, I cannot tell you whether or not any treatments mentioned on this website or in this article may or may not be appropriate for you, including K-taping your Achilles tendon. By following any information within this post, you are doing so at your own risk. You are advised to seek appropriate medical advice for any pain you may be experiencing.
What you’ll need
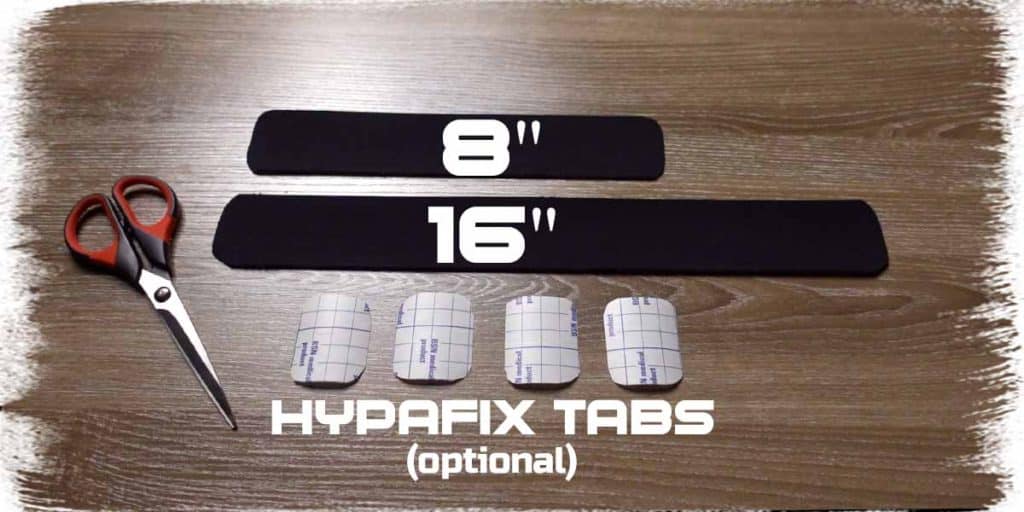
To perform the Achilles tape job described below, you will need:
- Two pieces of K tape (one piece approximately 16 inches in length, the other about 8 inches in length)
- A pair of scissors (to round the tape edges off)
- Optional: A few pieces of cover roll/Hypafix if you want to make sure the tape ends are really anchored down.
Taping principles you should try to follow
Regardless of the exact way you plan on applying K-tape (to any part of the body), some fundamental principles would be prudent of you to follow to maximize the effectiveness of your tape and the benefits that it can provide.
Principle 1: Make sure the skin/area you’re applying the tape to is clean, dry, and free of excessive amounts of hair. If you’re a guy, you’ll likely want to buzz any hair down so that you give the tape a fighting chance at not only sticking but also at increasing the fluid dynamics beneath the skin.
Principle 2: When it comes time to stretch the tape, try to use between 50 – 75% stretch. I tend to be a bit more aggressive with my stretch (around the 75% mark), while it’s most often advocated to use around 50%. It’s not worth using 100% stretch as it can cause some skin irritation as a result.
Principle 3: Try to ensure that the tape crosses over the sore spot of your Achilles tendon. With this taping method done in this blog post, you want to try and have all the strips of tape cross directly over the epicenter of the sore spot on the tendon. Theoretically, this achieves greater fluid dynamics underneath the skin while also reducing nociception from the irritated area to the greatest extent possible. In laymen’s terms: This helps the tendon have a healthier environment for healing while also decreasing the amount of soreness that your brain picks up on.
Principle 4: When possible, try to apply the tape with the skin stretched out (be taught) as much as possible. This helps the tape to help slightly lift the skin away as the skin slackens back up. You’ll notice that when you move the area/joint to a more neutral position, the skin wrinkles & lifts up a bit around the edges of the tape. That’s exactly what we’re after here.
Related article: Seven Easy Ways for Making Kinesio Tape Stick Way Better
The taping process: How to K-tape your Achilles tendon
Use the following steps and photos below to apply your K-tape to your Achilles tendon. It can be a bit tricky to learn how to use K-tape (especially on yourself) if you’re not familiar with using it, but, as plenty of my patients will attest, you will get the hang of it very quickly, so don’t stress if it’s not perfect the first time you tape yourself.
Start by rounding off the corners on each edge of the tape (and the Hypafix as well, if you plan on using it). This helps ensure that the corners/edges of the tape don’t lift off from the skin as easily.
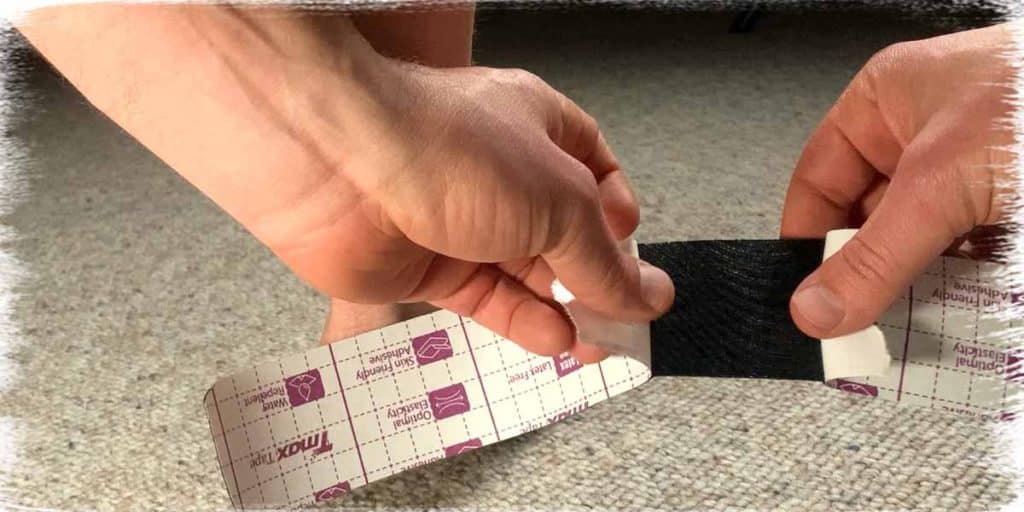
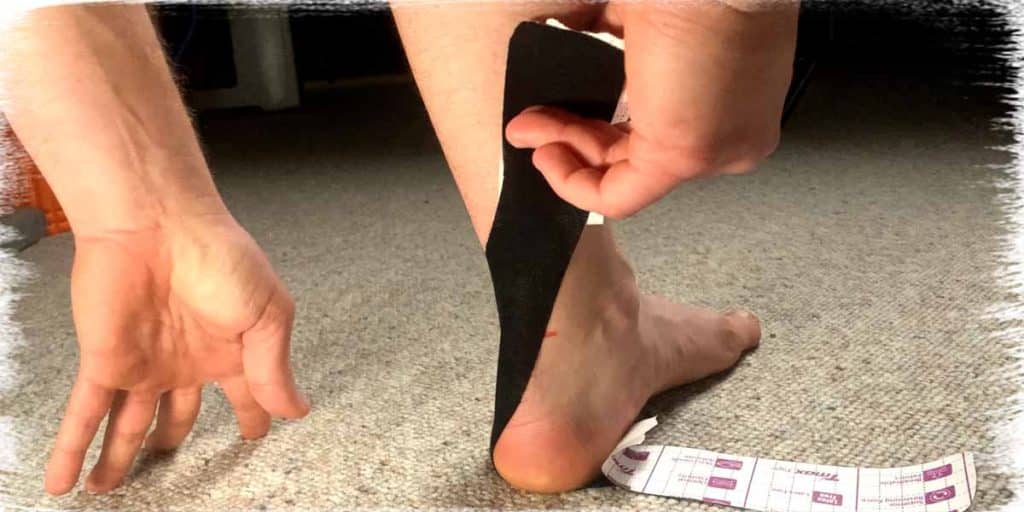
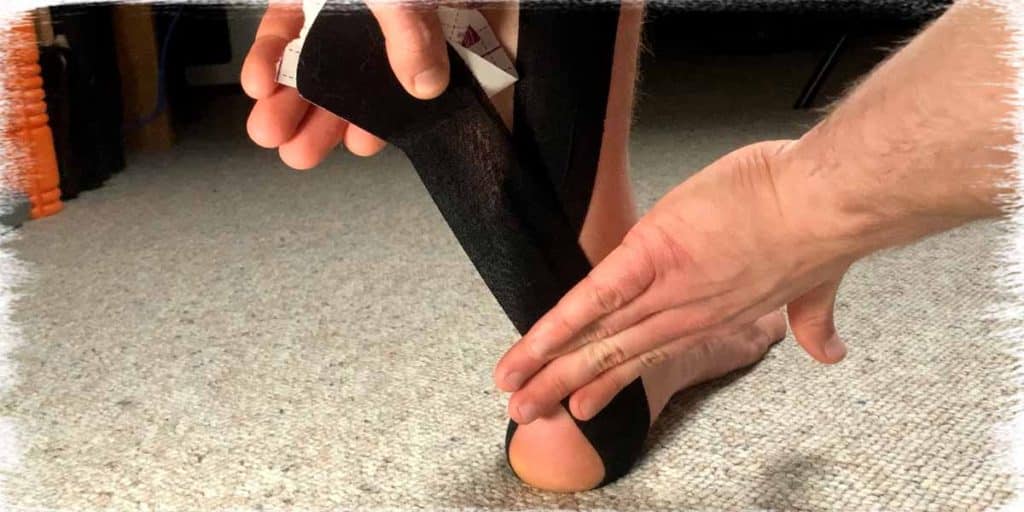
Step 1: Take the 12″ strip of tape and tear the paper backing right at the halfway point. Peel each end back an inch or two until you have enough of the tape backing exposed to place on the bottom of your heel. Firmly adhere this section of tape to your heel without any stretch on the tape just yet.
Step 2: Next, with your foot on the ground, lean forwards so that your foot flexes upwards, stretching out the Achilles region. Move into this position as far as possible while avoiding pain. You’ll then want to hold this position while applying the rest of the tape. By keeping the foot in this position as the tape is applied, the tape might help to “spring” your foot back a tiny bit when walking, which theoretically could help offload the tendon (it also just feels quite nice to tape the Achilles in this position).
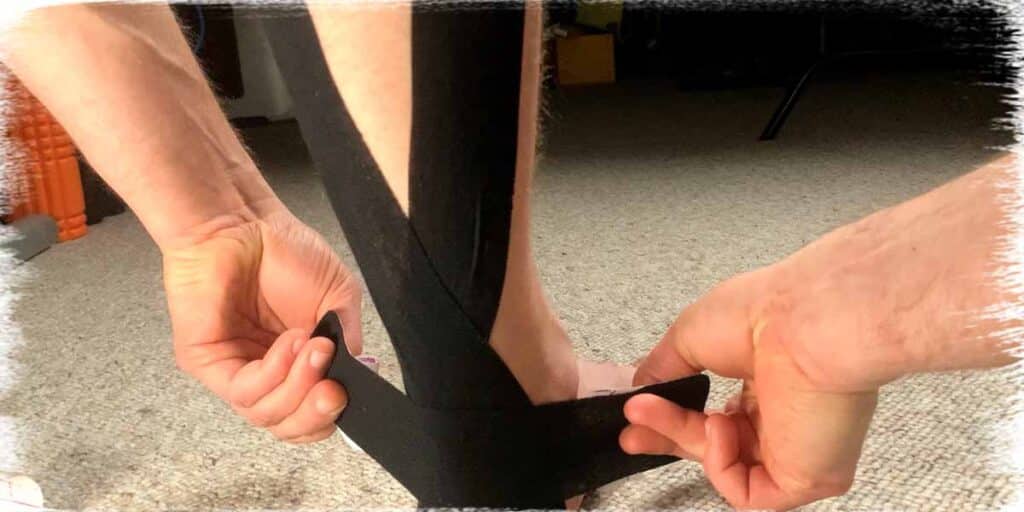
Step 3: Take one-half of the tape and peel the backing off (starting from the middle). Gently pull the tape so that it stretches out to between 50 – 75% of the tape’s ability to stretch. As you do so, begin to lay the tape down, ensuring that it crosses directly over the sore spot. Repeat the process on the other side, forming an “X” over the trouble area.
Step 4: Once the tape is applied, rub it firmly against the skin for about 5-10 seconds. This helps to ensure that the adhesive from the glue activates a bit more and makes good contact with the skin.
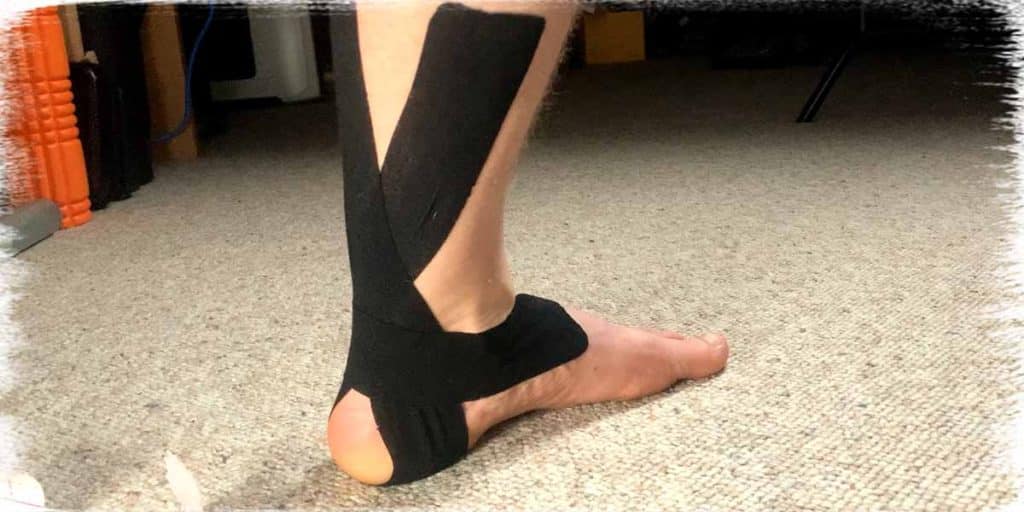
Step 5: For the last step, we need to take our 8-inch strip and create what’s often called “the horseshoe”. This involves sticking the middle of the tape strip on the back of the heel and then wrapping the ends just underneath the ankle bones towards the front of the foot. This strip of tape really helps ensure that the first strip of tape won’t start peeling off or get wrinkled around the back of the heel.
After following the above steps, take a moment to walk around to make sure that the tape isn’t uncomfortable in any way. It should feel like a nice sensation over the area, and you may even feel a bit of a “spring” in your step as you walk around.
That’s it! If you feel that your tape is anchored securely, then you’re good to go. You can shower with it on; just make sure to pat it dry (don’t rub it) when getting out of the shower. But, if you want to give some extra reinforcement to your tape to really make sure the ends don’t peel off on you, you can try the bonus tip below!
Related article: Plantar Fasciitis Taping: A MUCH More Effective Way (All By Yourself!)
Bonus: Making sure your tape sticks!
If you’re looking to add some extra reinforcement to make sure that your tape sticks to your skin, this little bonus tip can come in quite handy. It works especially well for active individuals who will be moving or sweating a lot while the tape is on their skin.
To perform this bonus tip, you’ll need to cut a few small squares off of a roll of Cover Roll (often called Hypafix). Cover roll is simply a hypoallergenic cloth-based fabric with adhesive on it, and it sticks really well to the skin. One roll of this stuff will last you for quite some time, so it’s worth having on hand for future taping applications (or for other needs). I usually use the two-inch-wide variety.
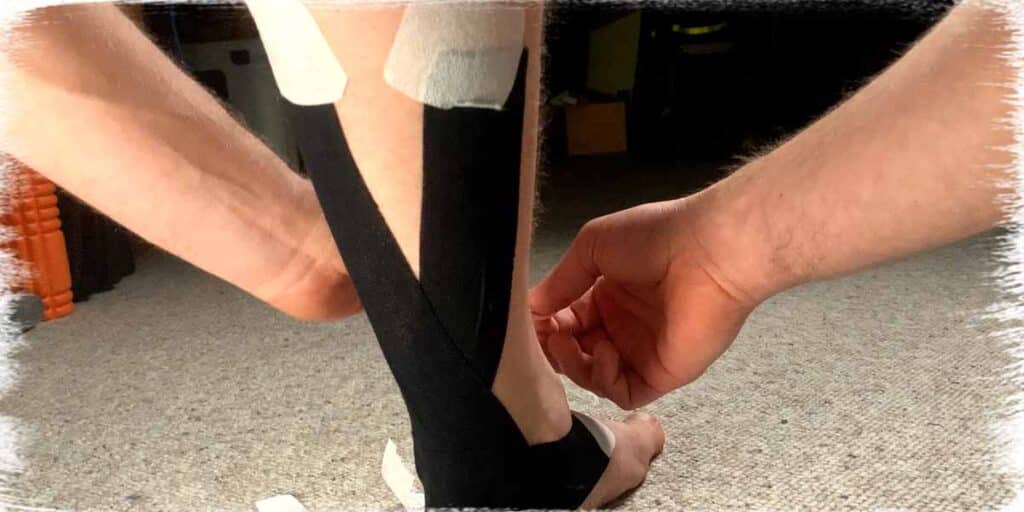
All you’ll need to do is cut four tabs (each one about 2 inches long) and round off the corners, just like you did with your K-tape (to ensure the cover roll doesn’t lift off from the skin as easily).
Next, peel the backing off and place half of the square tab on the end of the K-tape while the second half goes onto the skin. Repeat this process with all three other ends of the K-tape and give them a quick rub to make sure they’re firmly on there.
That’s it! You now have some extra reinforcement for making sure your tape stays on throughout all of your daily pursuits and activities!
Scientific findings of K-tape
If you’re curious to know a little bit more about how K-tape can help as a therapeutic adjunct in the process of pain reduction, you may find this section interesting. As well, you may find the following scientific articles to be of help as a starting point for learning more about what the academic literature has found overall in regards to utilizing K-tape for therapeutic purposes:
- The Effects of Kinesio Taping on Joint Position Sense of the Ankle
- The Effects of Kinesio Tape on Force Sense in People with Functional Ankle Instability
- Effect of Kinesio Tape Application on Calf Pain and Ankle Range of Motion
While Kinesio tape doesn’t have strong evidence towards assisting with the structural repair of tendons, it does have some neat findings regarding the ability to decrease the perception of pain arising within the area treated by the tape. This perception of pain is known as nociception. The ability for K-tape to exert its effects of decreasing nociception to the brain is believed to occur by the phenomenon known as gate control theory.
K-tape also has the unique ability to enhance the brain’s ability to perceive and interpret movement around or in the area in which the tape is applied. The ability for the brain to feel and interpret the movement of the body (along with knowing the position that the body part is in) is known as proprioception. Enhancing proprioception of a body part or region of the body can be very helpful in the re-education of movement as well as avoiding positions or postures from which injured body parts or tissues may be provoked.
So, even if the evidence isn’t exactly overwhelming evidence for K-tape to help with physical repair or regeneration of the tendon itself, the added benefits of decreased nociception and improved proprioception are certainly enticing, especially when it comes to avoiding pain or dysfunction in the first place.
Final thoughts
Hopefully, you’ve found this post to be helpful in some capacity. A sore Achilles tendon is not any fun to deal with, so nipping it in the bud before it becomes a more painful, chronic condition is a wise move to make. In that regard, Kinesio tape offers essentially no risk and potentially a high reward.
So, give it a try if you’re looking for a simple, non-invasive way to make sure that you don’t let pain or dysfunction become the boss of you!
Move well. Live bold.
-Jim.

Hi! I’m Jim Wittstrom, PT, DPT, CSCS, Pn1.
I am a physical therapist who is passionate about all things pertaining to strength & conditioning, human movement, injury prevention and rehabilitation. I created StrengthResurgence.com in order to help others become stronger and healthier. I also love helping aspiring students and therapists fulfill their dreams of becoming successful in school and within their clinical PT practice. Thanks for checking out my site!

