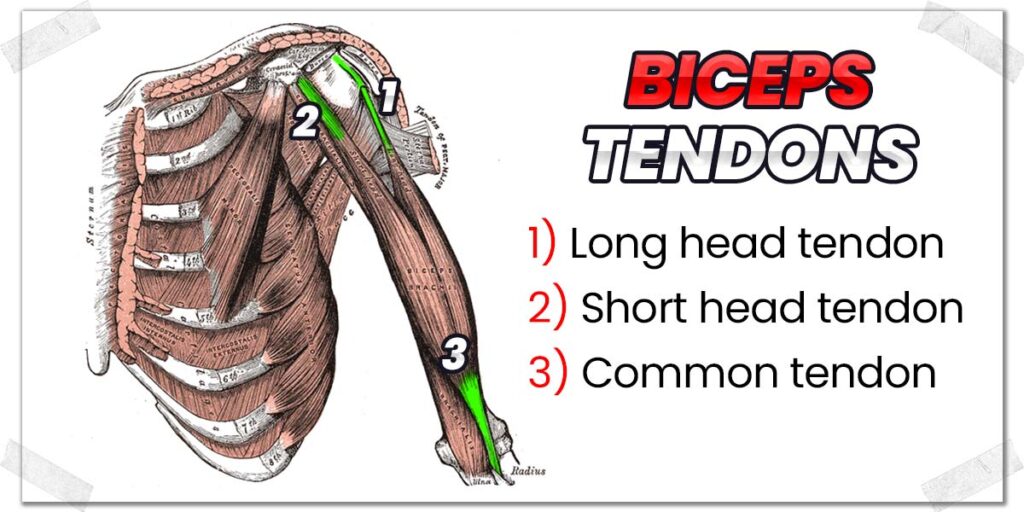
Tendon issues of the long head of the biceps are notoriously frustrating to deal with. The condition can be a total nuisance to deal with, whether it’s tendonitis, tendinosis, or even tenosynovitis. I deal with it all the time when treating patients in the clinic, and I see the frustration it can cause patients. So this article will walk you through some therapeutic exercises and tips I often provide my patients to help them recover from this condition as quickly as possible.
Various therapeutic tendon loading exercises for the long head of the biceps can be effective for improving tendon health when done correctly. They involve stimulating the tendon with enough resistance to improve its health without overworking it in the process.
Since unhealthy tendons don’t get better strictly with rest, understanding the basics of performing therapeutic loading (stressing) exercises is necessary for anyone looking to overcome a painful tendon condition.
So, let’s take it from the top; I’ll unpack the basics of tendon loading and then look at some specific loading exercises that emphasize the loading of the long head of the biceps tendon. After that, you’ll be pointed in the right direction to know how to overcome this condition once and for all.
Here are a couple of quick reminders here as we get started:
Reminder 1: A multi-faceted approach is always your best bet for tendon rehab. Therapeutic exercise should make up the backbone of the approach, but incorporating additional interventions can help augment the overall recovery speed. This can (but is not limited to) include:
- Improving your scapular (shoulder) mechanics to help offload the tendon from abnormal stress and force.
- Professional treatment interventions involving extracorporeal shockwave therapy – a highly validated and effective treatment for various tendon disorders.
- Self treatments such as cupping therapy and IASTM can be effective ways to increase blood flow to the tendon and help promote collagen fiber alignment, respectively. Both have some neat science behind their uses.
- Kinesiology taping for distracting the brain from pain (known as the gate pain control theory) and also for improving fluid dynamics underneath the skin. It can also be used to improve the shoulder and upper arm proprioception (movement awareness and positioning).
Reminder 2: Various pathologies (issues) can affect the long head of the biceps tendon, including tendinosis, tendinitis, and tenosynovitis. The exercises and associated loading parameters within this article are most effective for tendinosis (the most common of the three tendon issues affecting the long head of the biceps tendon).
Tendinitis and tenosynovitis are much less common, and while the exercises in this article can indeed be effective for these conditions, they can require a slightly different approach. Since tendinosis is the most common of the three, the following exercises and loading parameters are tailored specifically for this condition.
Basics of tendinopathy: What to know
Tendons are the structures within our body that anchor one end of a muscle onto a bone. They are a rather tough and gristly tissue with a very poor blood supply. This means that while quite strong, they have difficulty healing when they become unhealthy (due to low blood flow).
Simply letting a tendon rest in hopes it will fully resolve the issue is likely a futile approach; tendons have an immensely hard time getting better with rest, particularly if there is no inflammation within the tendon (i.e., it is in a state of tendinosis).
Tendons need a mechanical signal imposed upon them to initiate a healing and strengthening response. The physiology behind how and why this works is far beyond the scope of this article, but if you want to learn these details, I would highly suggest reading up on any scientific papers authored by Dr. Keith Baar, as his protocols are what I follow when treating my patients, which have been massively successful.
Therefore, when it comes to recovering from tendinopathy, the backbone of it all comes down to optimal loading parameters for the tendon. Once you understand these parameters and incorporate them into your rehabilitation exercise(s), you’ll be on the road to recovery.
Basics of tendon loading: make it optimal
Remember that familiar acronym, R.I.C.E., you often hear touted for dealing with injuries? This acronym stands for Rest, Ice, Compression, Elevation.
And when it comes to tendon issues, it may not be a bad idea, but only for the first few days after tweaking your biceps. If you suddenly strain your biceps tendon or feel an immediate sense of discomfort or pain, take this path, but only for the first few days.
After the first few days, you’re likely better off switching to the P.O.L.I.C.E. acronym, which stands for Protection. Optimal Loading, Ice, Compression, Elevation.
Related article: TENS vs EMS | Differences, Parameters & Best Practices for Each
Now, between you and me, I’m not much of an advocate for using ice with chronic tendon issues unless it’s just to kill off some pain, but I won’t dive into that within this article since I don’t know you or the extent of your biceps tendon issue. Personally, I take the heat route with chronic tendon issues.
Nonetheless, the key here is “optimal loading,” which (when done correctly) can serve as a mechanical stimulus to improve the health of the tendon, particularly those with tendinosis.
How to determine optimal tendon load
Optimal stimulation of an unhealthy tendon requires what I like to call “the Goldilocks phenomenon,” where the tendon can’t be under-stimulated but can’t be over-stimulated, either. Things need to be “just right” with loading to improve the tendon’s health.
The main rule to follow here is that if you don’t feel a single sensation in the targeted area (the biceps tendon), it’s an inadequate amount of stimulation. If it’s painful, however, it’s an excessive stimulation.
Related article: How (And Why) To Use a TRX For Injury Recovery: A Detailed Guide
Drumming up a mild discomfort (which is not the same as pain) usually signifies a “sweet spot” for optimal tendon load. The extent of discomfort you feel should be minimal (I tell my patients around a 2 or 3 out of a possible 10), and it should NOT increase during the exercise. It is allowed to decrease (which is an ideal sign), but you should be fine as long as the discomfort doesn’t increase.
Speed of loading
The speed of executing a tendon-based rehabilitation exercise is vital for success. Without getting into the scientific weeds, you MUST know that slow movement is much more ideal. It helps to reduce stress-shielding within the tendon while increasing shear on the tendon (which breaks down collagen cross-linking molecules that stiffen the tendon).
Trust me, I can get immensely scientific here, but I’m not going to. For the sake of this article, just be aware that the slower you go, the more effective the loading will be for adequately stimulating the tendon.
I often advocate taking five seconds to perform the first half of the exercise (the concentric phase) and another five seconds to return to the starting position (the eccentric phase). This equates to ten seconds for a single repetition. Bang out 12-15 very slow repetitions, and it should lead to ideal outcomes.
Rehabilitation timelines and frequency
Tendon rehab can range drastically in time to full recovery, depending on the severity of the condition and the overall health of the individual. For most people, performing loading exercises once or twice per day for three to six months is an adequate amount of time for tendon recovery. For some individuals, it can take up to a year. So, have patience and be persistent.
In terms of optimal frequency, again, it can really range depending on numerous factors. As a general rule, once per day should suffice as long as you’re not kicking the snot out of the tendon each time you load it and aren’t experiencing any extra soreness or worsening of symptoms by the time you perform your next loading session.
Again, these are general guidelines. If you’re not sure what’s optimal for your needs, check in with a qualified healthcare professional who is experienced with tendon-based rehabilitation (such as an orthopedic physical therapist).
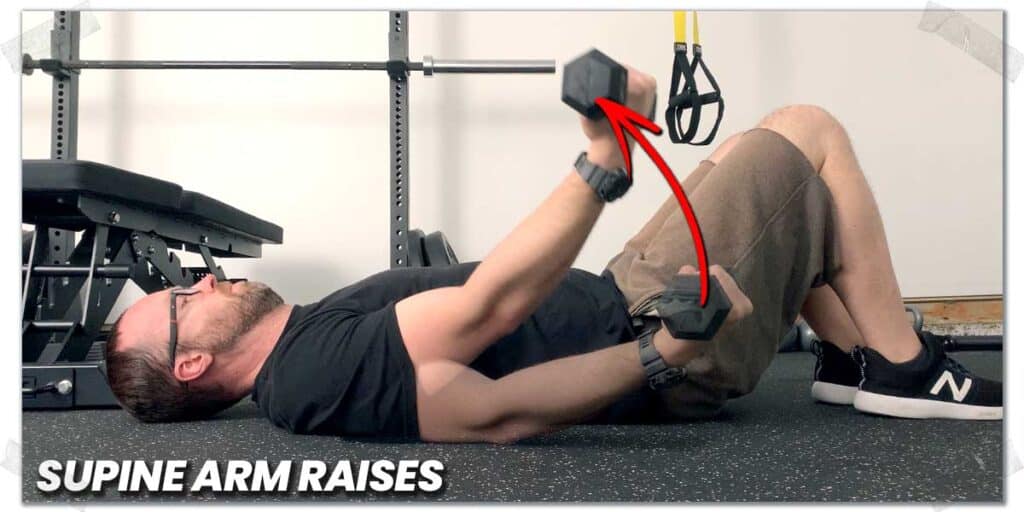
Exercise 1: Supine with dumbbell
The supine (lying on your back) straight-arm dumbbell raise is one of my go-to exercises for my patients since it’s simple, practical, and effectively loads the proximal biceps tendons.
You likely won’t need any weight beyond five pounds at the most. I find most of my patients need a two- or three-pound dumbbell when the long head of their biceps tendon is flared up. And if you don’t have a dumbbell, a soup can, water bottle, or any other similarly weighted household object can absolutely be used.
How to perform the exercise
- Lay on your back with the weight in your hand and your palm facing upwards.
- While keeping your elbow nearly straight (but not locked out entirely), slowly raise your arm up until approximately 45 degrees. (Going higher than this starts to decrease the load on the tendon.)
- Hold this top position for a second, then slowly lower your arm back to the starting position.
- Rest for one second, then repeat the movement.
Pro tip: The straighter you hold the arm, the more you will load the proximal biceps tendons. The more you bend your elbow, the less you will load it (up to a certain point). As such, you can play around with your elbow position if you need to slightly lessen the effort required to complete the exercise.
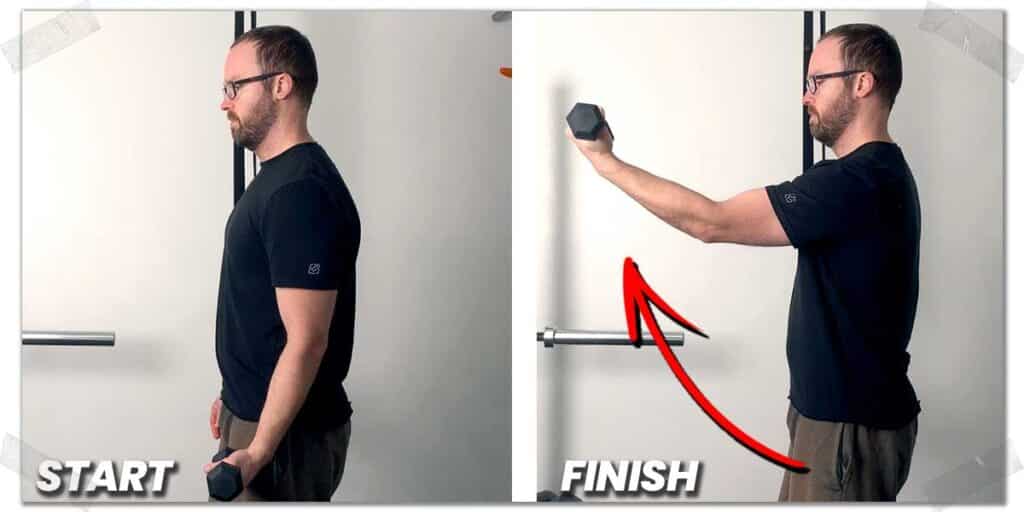
Exercise 2: Standing with a dumbbell
The standing version of the dumbbell raise is exactly the same as the supine version (exercise 1) but becomes more challenging when performed while standing due to the larger range of motion involved.
As such, I tend to use this exercise as a progression from the supine version once my patient can perform supine raises with a moderate amount of effort or exertion and minimal discomfort.
How to perform the exercise
- Stand with your arm at your side and your palm facing upwards.
- With your elbow nearly straight, slowly raise your arm upwards. Try to get your arm parallel to the ground, if possible. You can go higher if you’d like, but parallel should suffice. If you can’t make it this high, you may want to lighten the load.
- Hold the top position for a second and then slowly lower your arm back to the starting position.
- Take a break for one second in between each repetition.
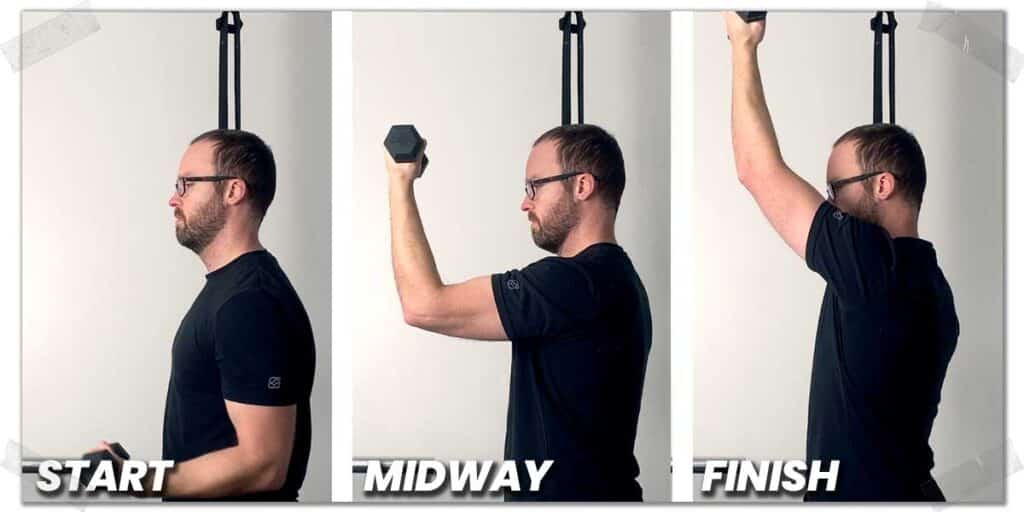
Exercise 3: Bent-elbow shoulder flexion
I often give this biceps loading exercise to patients who have progressed beyond what their arm can adequately lift using a straight-arm position (there will come a point where the arm can’t naturally lift any more weight without it being too uncomfortable on the elbow or shoulder itself).
This bent-elbow version places less torque on the shoulder since the arm is bent, which allows the individual to use a heavier weight, which is ideal since the biceps tendon needs to be loaded with relatively heavier loads when returning to full health.
As such, this is often a later-stage exercise given to my patients.
How to perform the exercise
- Sit or stand with a dumbbell in your hand, and your elbow bent to 90 degrees.
- While keeping your elbow bent to 90 degrees, slowly bring your arm forwards as if doing an uppercut punch.
- Once your upper arm is parallel with the ground, begin straightening your elbow as you continue to push the dumbbell above your head (like an underhand shoulder press).
- Once you’ve gone as far as comfortable or able, slowly lower the weight back down in a reverse motion of how you raised the weight from the starting position.
Pro tip: You can opt to just perform the first portion of the movement (raising your upper arm to be parallel with the ground) without continuing onto the second portion of the movement if you’d prefer; this will still be an adequate stimulus to your long head of biceps tendon.
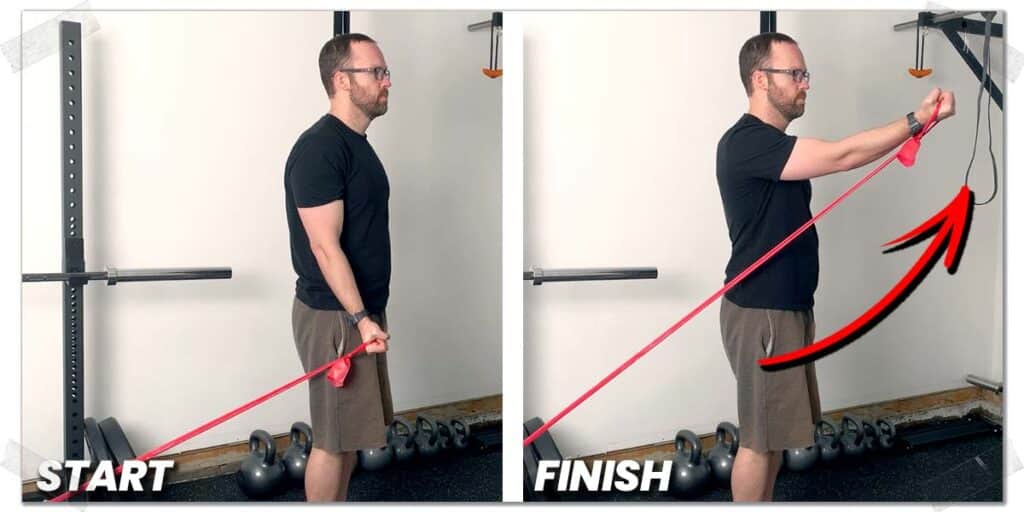
Exercise 4: Standing with TheraBand
This exercise may appear to be the same as the standing dumbbell arm raise (exercise 2), but it, in fact, has a unique difference.
To be clear, it’s very similar. Still, since it’s performed with a TheraBand (or another type of stretchable tube or band), the resistance actually changes throughout the exercise (unlike when using the dumbbell). This is known as accommodating resistance, which can be a great way to load and challenge tendons for rehabilitation.
It’s not “better” than the dumbbell version, but it may be more ideal for your needs based on the health and abilities of your biceps tendon. As such, this version is worth experimenting with if you like the dumbbell version but want something a bit different.
I often have my patients perform one of two versions of this exercise based on the irritability of their biceps tendon.
- Version one is often best for more irritable tendons or patients with less arm strength.
- Version two is often best for healthier tendons that are less irritable or need a greater challenge than what version one can offer.
Keep in mind that the difficulty and appropriateness of each version are highly dependent upon the resistance of the band you use.
How to perform the exercise (version 1)
- Anchor one end of the TheraBand around an approximate knee height or lower object.
- Loop the band around your hand and stand with your arm by your side. Step away from the band’s anchor point just enough so that there is very minimal tension (no slack) on the band.
- Keep your elbow nearly straight and slowly pull your arm upwards until parallel with the ground.
- Hold this position for a second, then slowly return to the starting position.
- If you need more resistance, step forwards so that the band has greater initial tension when starting the movement. Ensure your hand is right by your side when starting each repetition.
How to perform the exercise (version 2)
- Anchor one end of the TheraBand around an approximate knee height or lower object.
- Loop the band around your palm and step far enough away from the band’s anchor point so that your arm is gently pulled behind you by the band. There should be mild-to-moderate tension on the band.
- Keep your elbow nearly straight and slowly pull your arm upwards until it’s parallel with the ground.
- Hold this final position for a second before slowly returning to the starting position.
- Use a heavier resistance band or step further away from the anchor point if you require more resistance.
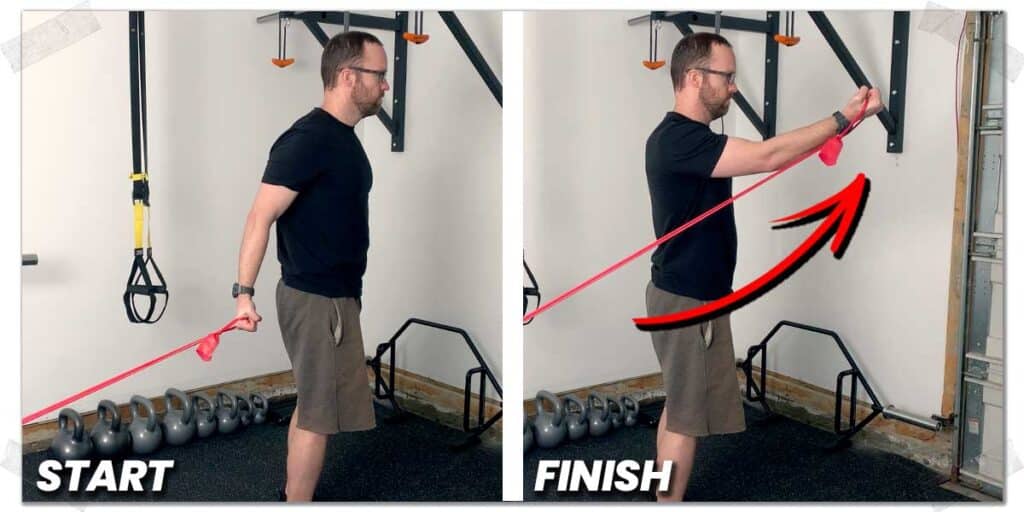
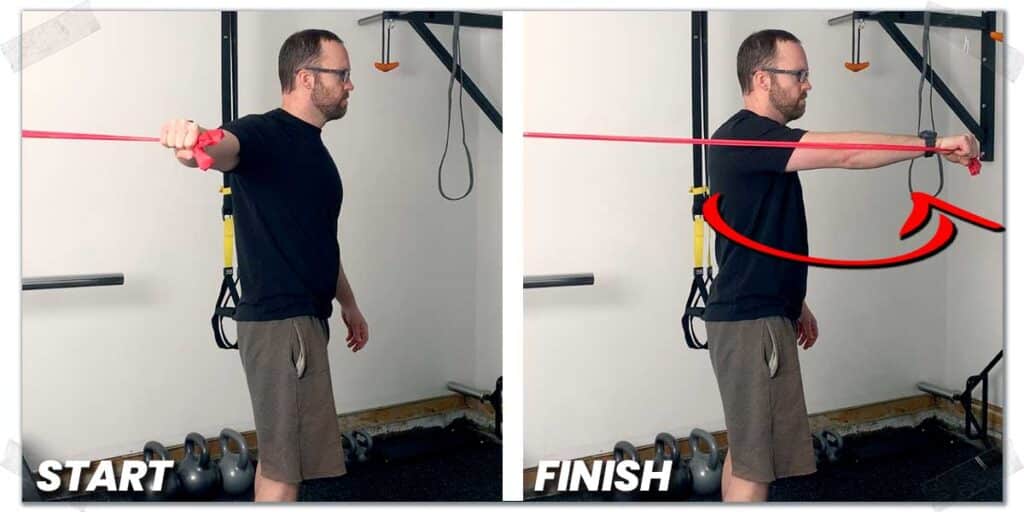
Exercise 5: Cross-arm flexion with TheraBand
This cross-arm biceps loading exercise isn’t drastically different in concept than the banded exercise mentioned above (exercise 4). However, it loads the tendon through a different movement plane (the transverse plane) rather than forwards to backward (the sagittal plane).
As such, you may find it more ideal based on your circumstances, or you may just enjoy having a different direction to move in when performing your tendon rehab.
Since your thumb won’t be pointed up when pulling your arm across your body, you won’t engage the pectoral muscles as much as you otherwise would with your thumb pointing upwards.
Again, neither plane of movement is right nor wrong, so just find what works best for you.
How to perform the exercise
- Anchor one end of the band around a stationary object at shoulder height.
- Grab the other end of the band with an overhand grip so that the end of the band is coming out of the space between your thumb and index finger.
- Face away from the anchor point and raise your arm out to the side up to shoulder height. Ensure there is no slack on the band in this position.
- Slowly pull your arm across your body until your arm is slightly across the midline of your body.
- Hold this position for a second, then slowly return to the starting position.
Final thoughts:
Tendon issues involving the long head of the biceps tendon can be very annoying and stubborn to deal with, but therapeutic exercises are often highly effective in improving tendon health when appropriately selected and performed with ideal parameters, so don’t lose heart.
If any exercises in this article are appropriate for you, get in the habit of being patient and persistent as you put them into action. As well, consider taking advantage of additional interventions to optimize the recovery process. Physical therapists, for example, are well-versed in treating and rehabbing tendon issues and can offer additional strategies and treatments to ensure your recovery goes as smoothly and quickly as possible.
Frequently asked questions
To help you out as much as possible, I’ve included a few answers to commonly asked questions that fitness goers and average joe’s often ask when dealing with biceps tendon issues. I hope the answers and insight below can add more value and clarity to helping you out when dealing with a biceps tendon issue.

Hi! I’m Jim Wittstrom, PT, DPT, CSCS, Pn1.
I am a physical therapist who is passionate about all things pertaining to strength & conditioning, human movement, injury prevention and rehabilitation. I created StrengthResurgence.com in order to help others become stronger and healthier. I also love helping aspiring students and therapists fulfill their dreams of becoming successful in school and within their clinical PT practice. Thanks for checking out my site!
