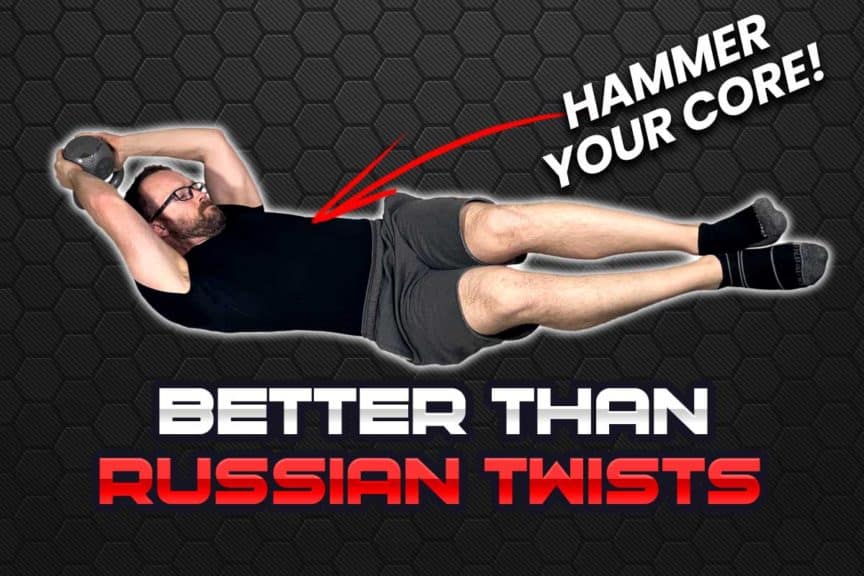
Once a popular core exercise, the Russian twist has since fallen out of favour with many health and fitness professionals, and for good reason — this exercise is notorious for tweaking the joints of the lower back and irritating vertebral discs.
Now, if you want to challenge your core in a similar manner but don’t want to irritate your spine, you’re in the right place. This article will walk you through five alternative exercises that will hammer your core muscles in a similar fashion to the Russian twist, all while saving your spine in the process.
Five outstanding alternative exercises to the Russian twist are:
- Tabletop self-resisted dead bugs
- Supine weighted rotational dead bugs
- Half-kneeling windmills
- Single-leg standing side-bends
- FMS hard rolls
So, if you want to learn the details of each one of these highly effective exercises, as well as why they’re superior to the Russian twist, then keep on reading!
ARTICLE OVERVIEW (Quick Links)
Click/tap on any of these headlines to instantly jump to that section of the article
Issues with the Russian twist
Exercise 1: Tabletop self-resisted dead bugs
Exercise 2: Supine weighted rotational dead bugs
Exercise 3: Half-kneeling windmills
Exercise 4: Single-leg standing side-bends
Exercise 5: FMS hard rolls
Rerlated article: Best Ab Wheel Exercises for Avoiding Back Pain: Beginners, Listen Up!
Issues with the Russian twist
There are a few key reasons why the Russian twist has a notorious reputation for tweaking lower backs from time to time. If you want the complete breakdown, be sure to check out my article: Why Russian Twists are Hurting Your Back (And What to do About it), where I walk you through all you need to know.
But, here’s the quick rundown if you’re just looking for the consolidated version:
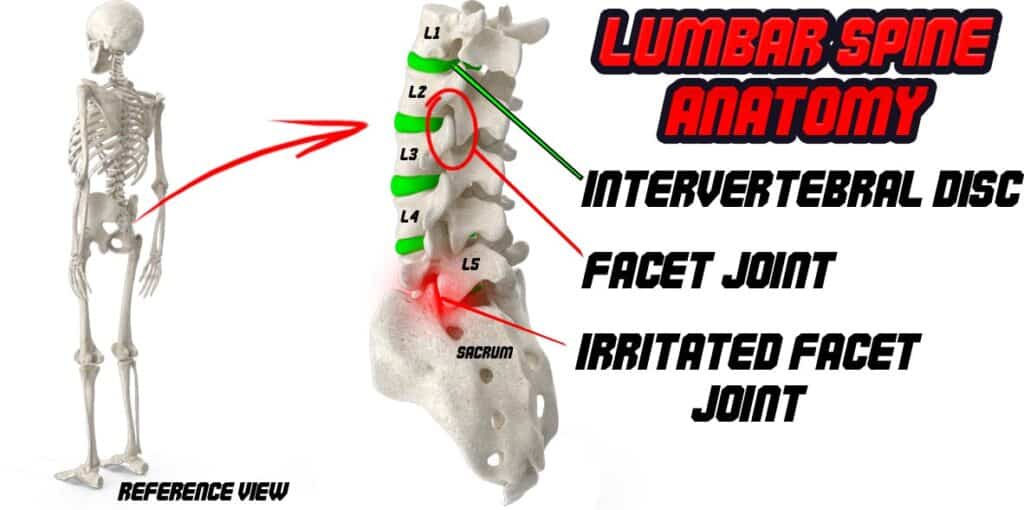
The Russian twist places the lumbar spine (the bottom five vertebrae) in a position where it’s prone to flexion (bending) while undergoing large (and sometimes fast or aggressive) twisting motions. This is a bit problematic in and of itself; however, the issue with this further compounded since the bottom region of the spine (the sacrum) is essentially anchored to the ground while this occurs.
This results in a fixed anchor point of the spine that is now experiencing sometimes large and rapid twisting/rotation against resistance, creating more torque through the facet joints and the annular fibers of the intervertebral discs. The lumbar facet joints tend not to appreciate repeated movements of this nature, and if there are any underlying disc issues in the lumbar spine, the nature of this exercise can now further irritate them.
Mind you, not everyone will experience pain or discomfort with the Russian twist. Still, if you’ve experienced discomfort with this exercise in the past or just have a history of lower back issues, it’s probably worth foregoing this exercise altogether and opting for any of the alternative exercises discussed below.
Exercise 1: Tabletop self-resisted dead bugs
Welcome to one of the most deceptive core exercises you could ever come across. Don’t skip over this exercise thinking it won’t be aggressive enough for you. When done properly, your entire torso, along with your deep spinal stabilizers, will get hammered.
Remember: this exercise is as challenging as you make it out to be, so you can optimize the amount based on your needs.
To perform the exercise
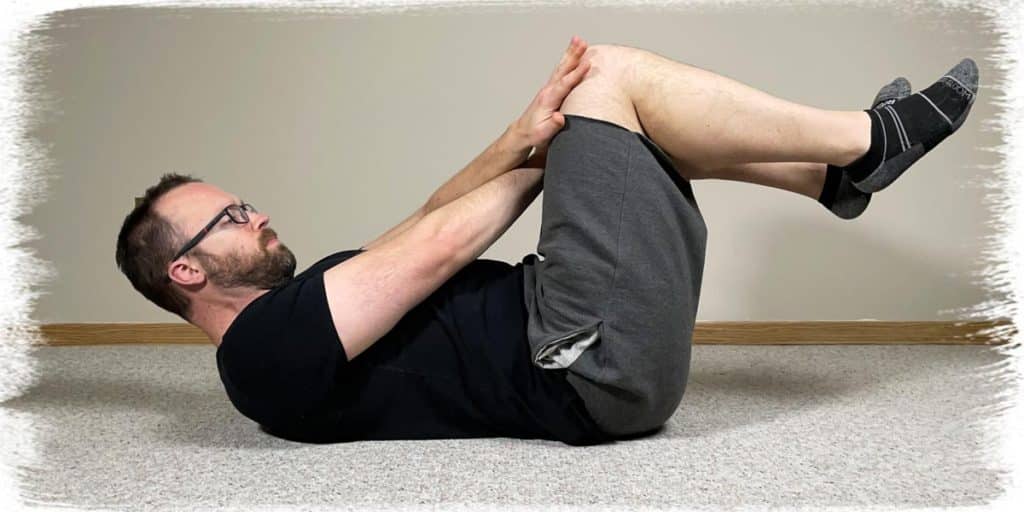
- Lay on your back, bend your knees and then lift your legs so that your thighs are perpendicular to the ground.
- Place your left hand on your right knee and then place your right hand on your left knee.
- Flatten your lower back so that it makes contact with the surface you’re resting on. Keep it in this position AT ALL TIME throughout the upcoming movement; if you arch your back, you’ll lose nearly all the benefits of this exercise.
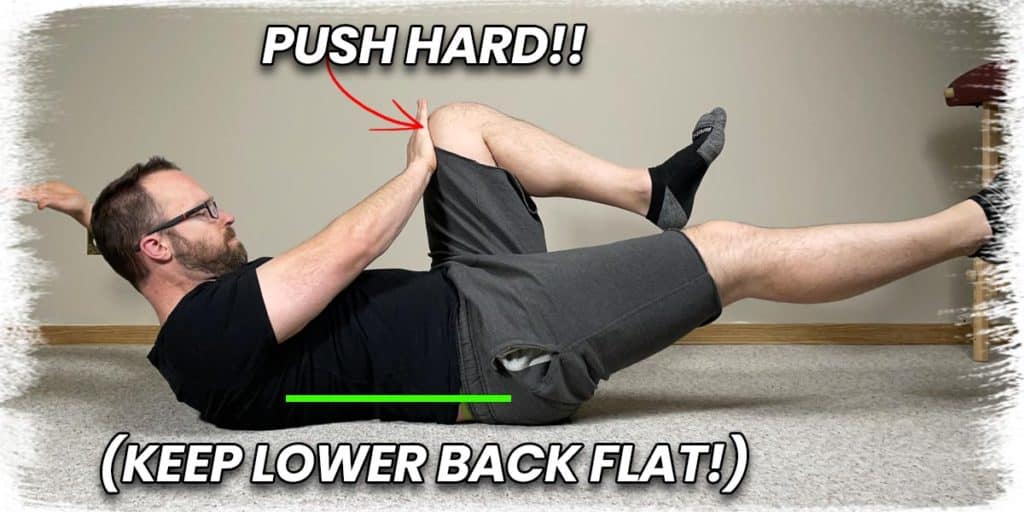
- Aggressively push your left hand into your right knee as you try to pull your right knee up towards your chest. Maintain this aggressive push at all times.
- SLOWLY raise your right arm behind your head while straightening your left leg. Go as far as you can without arching your back while maintaining the aggressive push with your opposite hand and opposite knee.
- SLOWLY return to the starting position and repeat.
Why these self-resisted dead bugs are so effective
This exercise is incredibly spine-friendly and targets the oblique muscles in a very functional pattern (the anterior oblique sling), which involves a portion of the upper inner thigh muscles a well. Additionally, it requires no equipment, and you can make it as easy or as aggressive as you want, simply by modulating how aggressively or passively you press your knee and hand together while performing the dead bug movement with the opposite arm and leg.
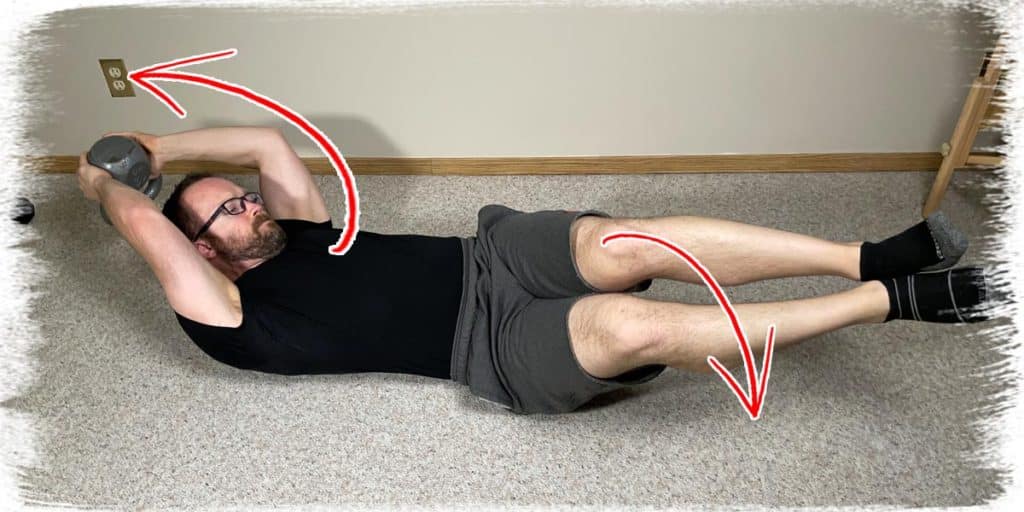
Exercise 2: Supine weighted rotational dead bugs
This exercise probably has a different name, but I don’t know what it is, so this is what I’m calling it. The most important concept to know here is that this movement will aggressively challenge rotational control of your torso while simultaneously forcing you to maintain activation of your deep core muscles. Rotational control is all about performing a movement as slowly as possible while using an ideal amount of resistance to optimize the challenge.
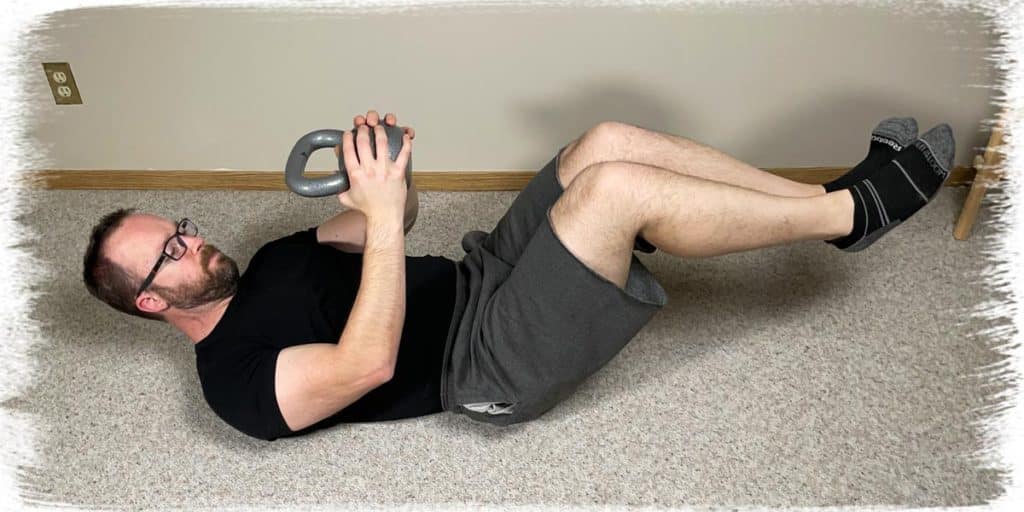
To perform the exercise
- Hold a single dumbbell with both hands, or hold a double in each hand (you can do this with kettlebells as well).
- Assume the tabletop position (exercise 1) with your lower back pressed into the ground. Hold your lower back in this position at all times for this exercise.
- SLOWLY drop your arms behind your head and slightly off to the right side
- At the same time, rotate your hips to the left, letting your legs slowly drop towards the ground.
- Return to the starting position and repeat for desired repetitions.
Why these rotational dead bugs are so effective
Just like with the previous exercise, this movement targets the core and oblique muscles in a way that somewhat mimics the anterior oblique sling of the body. It’s also more ideal than the Russian twist since the spine isn’t anchored to the ground as you rotate, which reduces torque on the joints.
What’s even better, since you’re laying on your back, there isn’t as much compression being placed on to the joints and discs, and it’s much easier to maintain a neutral spine (not flexing it) throughout the movement, making it much less irritating on the discs.
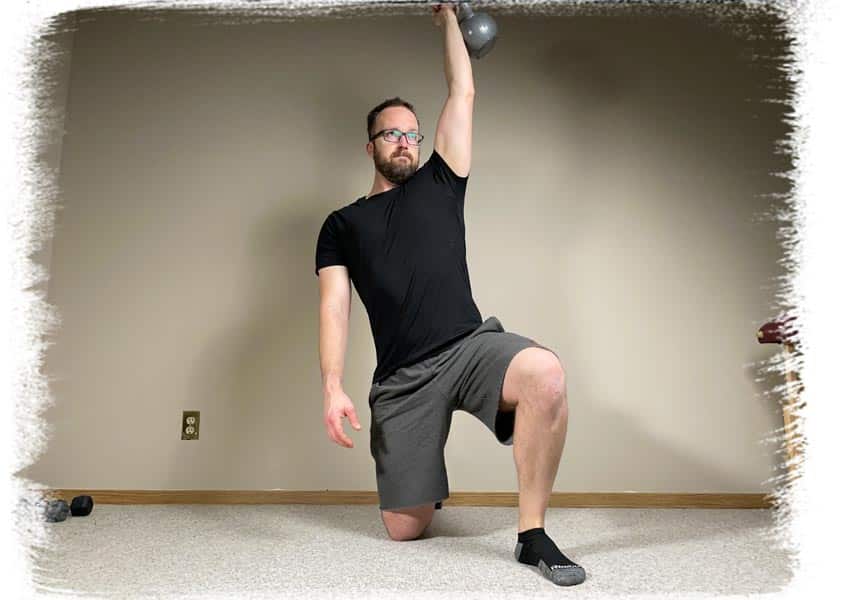
Exercise 3: Half-kneeling windmills
The windmill is a classic exercise that emphasizes controlled movement in addition to spinal mobility and core strength. It can be performed from a full-standing position; however, I find high favour in performing it from the half-kneeling position for those who have never attempted it or need to start with small ranges and work up from there.
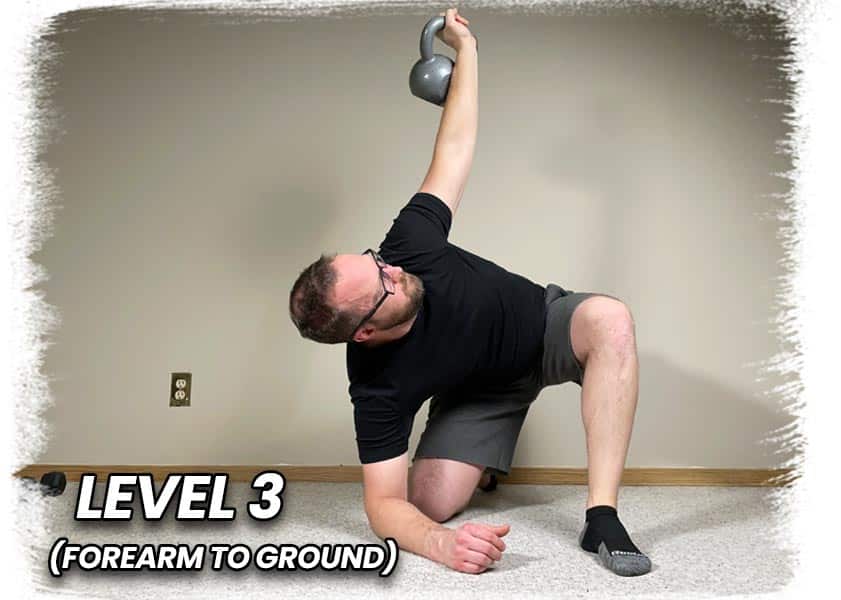
I have three levels or progressions that can be used in the half-kneeling position, so start with level one and then progress up to level two and then three if able. Just keep it at an appropriate level for you and your abilities.
To perform the exercise
- Get into the half-kneeling position with one knee on the ground and the foot of the opposite leg on the ground.
- Grab your weight with the hand on the opposite side of which your knee is touching the ground. (i.e. if your left knee is on the ground, but the weight in your right hand). Raise the weight straight above your head.
- Take your free arm and keep it straight while resting at your side.
- Slide your free hand towards the ground, bending towards that side. Keep the arm that’s above your head vertical at all times!
- Once your fingertips in your freehand touch the ground, return to the starting position and repeat (level 1 progression).
Pro tip: If touching your fingertips to the ground is too easy, level 2 is to touch your entire palm to the ground. If you still need more challenge, try level 3: touch your entire elbow to the ground.
Why these windmills are so effective
The half-kneeling windmill (along with standing windmills) occurs almost exclusively in the frontal plane. As a result, there is no rotational force occurring around the spine. The large range of lateral flexion motion of the spine that you can work up to can test (and improve) your mobility in certain situations. As well, the frontal-plane dominant movement of this exercise hammers the oblique muscles.
Exercise 4: Single-leg standing side-bends
I’m not against traditional standing side-bends; I just find that standing on one leg while performing them offers an added element of controlling one’s movement while aggressively attacking muscles of the hip in addition to the oblique and deep core muscles.
You will find that this variation requires much more concentration and forces you to slow your movement down extensively to ensure that you don’t lose your balance. Go as heavy as you can while maintaining your single-leg stance throughout your repetitions. You will feel your oblique muscles get attacked along with the muscles of your hip, which have to aggressively co-contract at all times to ensure you don’t lose your balance.
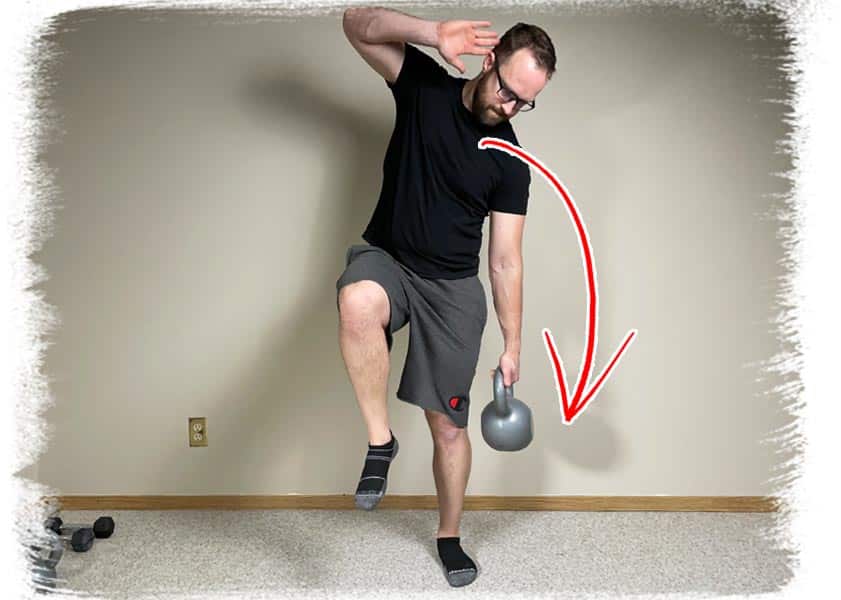
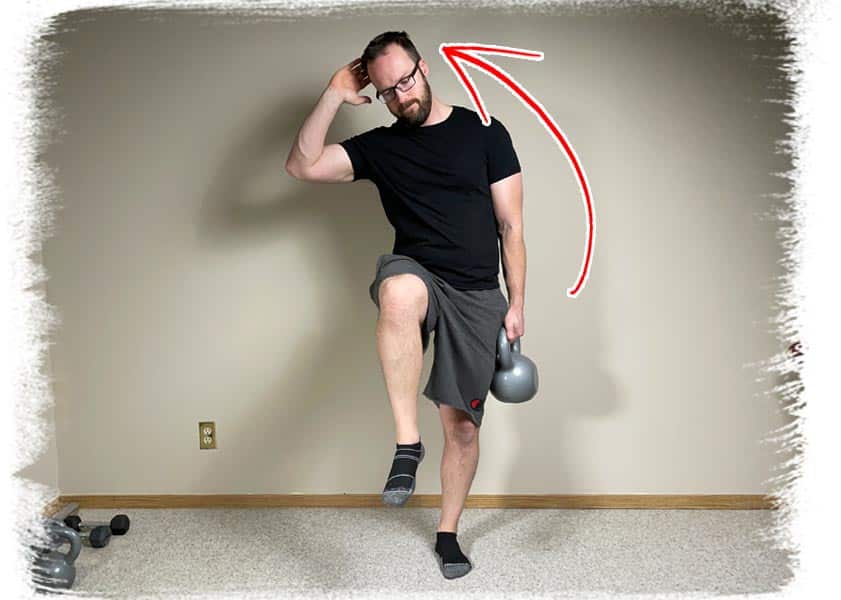
To perform the exercise
- Place a weight in your hand.
- Lift the opposite-side leg in the air so that your hip and knee are both bent to 90 degrees. Hold it here throughout the duration of the exercise.
- Slowly bend sideways as far as you can towards the side you’re holding the weight on.
- After bending as far as you can, return to the starting position and repeat.
Pro tip: Use the heaviest weight that you can for this exercise (while being able to control the movement and maintain balance on a single leg). You will feel this in your obliques and hip muscles quite nicely as a result.
Why these side-bends are so effective
Learning how to control the movement of your spine against resistance is a critical component in spinal hygiene (maintaining the health of your spine). Standing on a single leg as you slowly fight resistance is a great way to do this. The added benefit here is that your hip muscle will also receive a healthy stimulus. Plus, since hips and lower back pain are often highly correlated, ensuring your hips stay strong and healthy is an added layer of protection in keeping your lower back as pain-free as possible.
Exercise 5: FMS hard rolls
Prepared to be humbled. That’s all I can really say here. The FMS hard roll is a movement I learned some years ago from Functional Movement Systems when taking their Functional Movement Screening Level II course.
All you need is a small object such as a yoga block, mini foam roller, etc., that you can press between your knee and opposite elbow. From there, follow along with the instructions below and get ready to produce deep core muscle activation while having to use your obliques to roll accordingly.
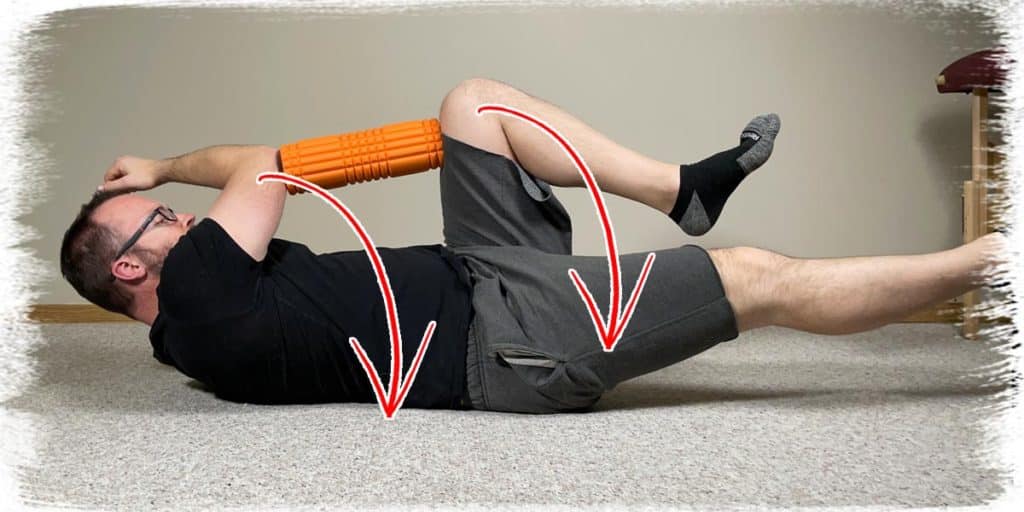
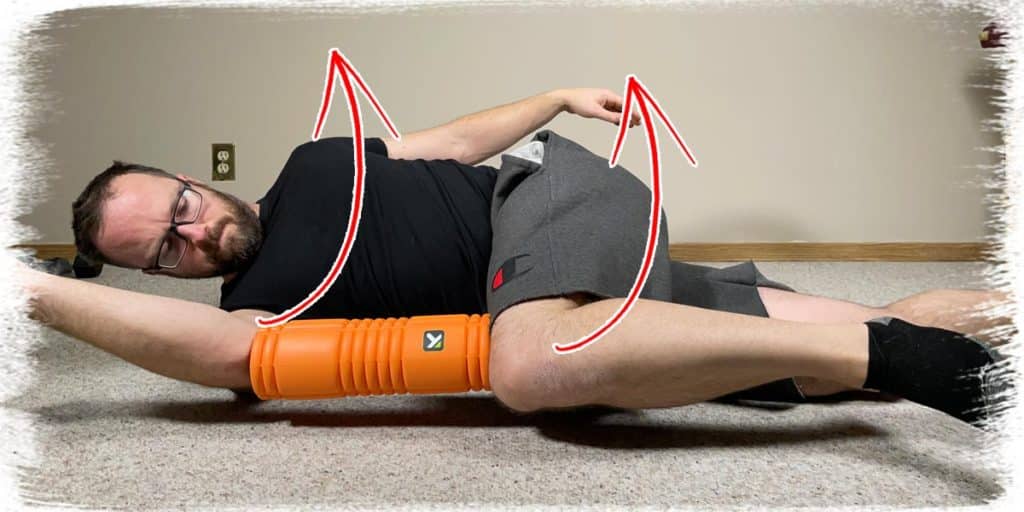
To perform the exercise
- Lay on your back and take a yoga block (or similar-sized object) and press it between your left elbow and right knee. Press it together as hard as possible throughout the entire exercise.
- With your right arm above your head, roll to your right as far as possible while maintaining the tension you created in step one.
- Now, roll back to the starting position (have fun with this).
- Repeat for as many repetitions and then switch sides and repeat.
Why hard rolls are so effective
The FMS hard roll forces you to create and maintain tension and rigidity around your spine while rolling, which is why it’s known as a rotary stability exercise. As a result, this movement challenges your strength while teaching your brain to activate and continually contract these muscles as a means to help stabilize your spine in the process. And since spinal rotation is an incredibly functional movement in terms of daily living requirements, improving spinal stability while doing so will go a long way for injury prevention to your lower back.
Pro tip: The closer you have your elbow pressed to your knee, the harder the FMS hard roll will become; it will be the opposite effect if you have your elbow and knee further away from each other. So, pick an object of appropriate size that creates the optimal challenge for your abilities!
Final thoughts
Unless you have an undying desire to perform the Russian twist, it’s highly likely that you can find an alternative exercise that not only challenges the same muscles but does so while challenging them even more aggressively AND while keeping your spine healthy and happy in the process.
Give these exercises a try if you’re looking for alternatives to the Russian twist. It’s highly likely that your spine will love you for doing so while your core muscles will receive a massive challenge and hate you (in a good way, that is).

Hi! I’m Jim Wittstrom, PT, DPT, CSCS, Pn1.
I am a physical therapist who is passionate about all things pertaining to strength & conditioning, human movement, injury prevention and rehabilitation. I created StrengthResurgence.com in order to help others become stronger and healthier. I also love helping aspiring students and therapists fulfill their dreams of becoming successful in school and within their clinical PT practice. Thanks for checking out my site!