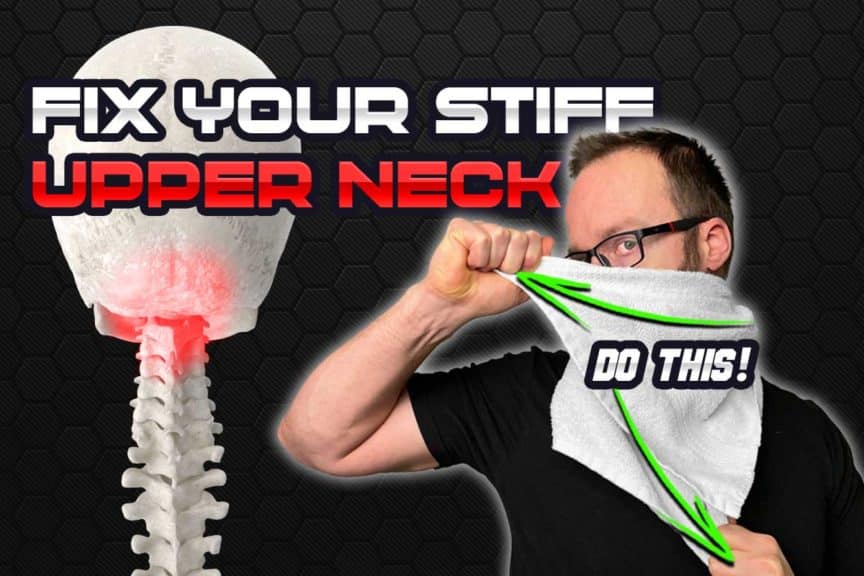
This article will walk you through a highly effective way to reduce tension and improve mobility in your upper neck; there’s a lot of information online for how to do general stretches for your neck, but not much for the upper neck. So, this article will walk you through all you need to know to perform effective stretches to get this area feeling better.
The best way to stretch a stiff upper neck is to perform the SNAG exercise, which enhances the movement of the upper cervical joints and stretches the suboccipital muscles. This orthopedic technique is often used by physical therapists and can be performed at home with a small towel.
The acronym “SNAG” stands for “Sustained Normal Anatomic Glide” or “Sustained Natural Apophyseal Glide,” depending on who you ask. It’s an orthopedic technique developed by the renowned physical therapist Brian Mulligan. And the best part is that you can do this at home using only a hand towel!
If you’re interested in all the details of how to perform this exercise, keep on reading!
ARTICLE OVERVIEW (Quick Links)
Click/tap on the article headlines below if you want to instantly jump to that section
• Basic anatomy of the upper neck
• Why general neck stretches won’t work
• What you’ll need
• How to perform the SNAG
• Bonus tip: Do THIS with your posture
Related articles you might also enjoy:
The Iron Neck: The ULTIMATE Review from a Physical Therapist
Compelling Reasons: Why Buying the Iron Neck is Worth Your Money
Disclaimer: While I am a physical therapist, I am not YOUR physical therapist. As a result, I cannot tell you whether or not any treatments or training methodologies mentioned on this website or in this article may or may not be appropriate for you, including upper neck exercises. By following any information within this post, you are doing so at your own risk. You are advised to seek appropriate medical advice for any pain you may be experiencing.
Basic anatomy of the upper neck
Having a basic understanding of the anatomy of the area of your neck that is causing you grief will go a long way; by understanding some of the joints, muscles and their combined functions, performing the SNAG exercise will be much more intuitive for you. As a result, you’ll have a much higher level of confidence when it comes to knowing whether or not you’re performing the movement correctly and if you need to refine your technique.
Alright, let’s quickly learn about the upper cervical joints along with the suboccipital muscles along with how and why these structures cause a stiff and sometimes painful upper neck.
The upper cervical joints
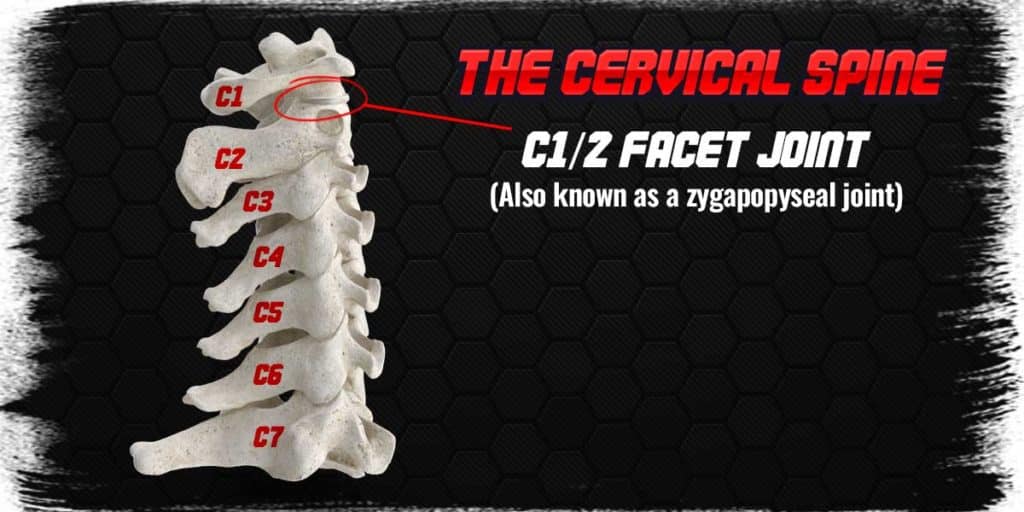
There are seven vertebrae that comprise the cervical spine (the neck bones), and the first and second cervical vertebrae are classified as the upper cervical spine.
When compared to the other five cervical vertebrae that make up the middle and lower neck, the first and second vertebrae are rather unique in terms of the type and amount of movement they produce for our head/neck.
The first cervical vertebra: This is the neck bone that sits directly underneath the base of our skull. As a result, the articulation (joint) between the base of the skull (the occiput) and the first cervical vertebra is responsible for producing a considerable amount of being able to look up and down (as if nodding “yes”).
Fun fact: The first cervical vertebra is also known as the atlas.
The second cervical vertebra: This neck bone sits underneath the first vertebra and is responsible for approximately half of all the movement your neck produces when rotating from left to right (as if shaking your head “no”). As a result, the joint interface between the first and second vertebrae will receive a healthy stretch with the upcoming SNAG movement about to be performed.
Fun fact: The second cervical vertebra is also known as the axis.
The cervical spine joints (where one cervical vertebra articulates with another) are known as facet joints. Each of these facet joints should allow for a specific range of movement, depending on which level in the cervical spine the motion is occurring from.
The suboccipital muscles
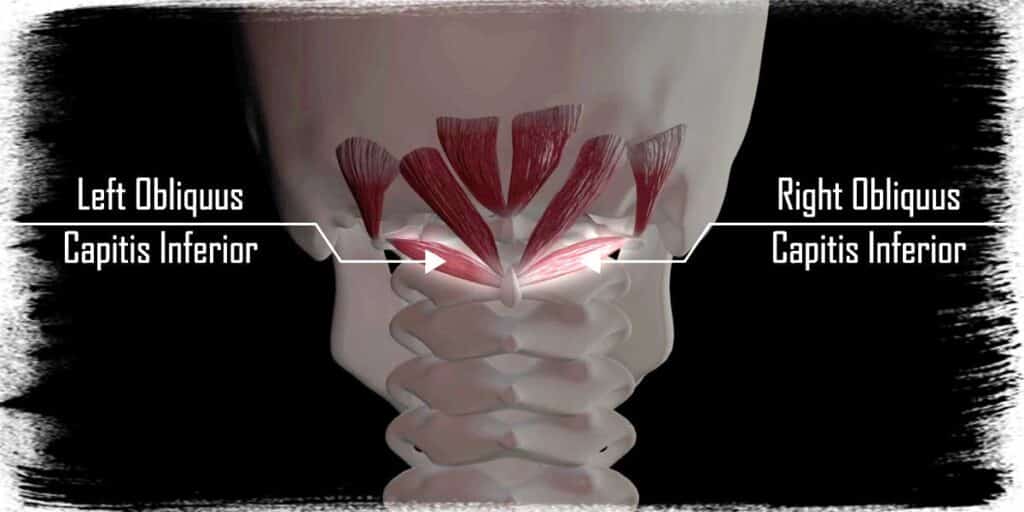
There are four unique muscles on each side of the upper neck (making eight in total) that are notorious for causing upper neck stiffness, pain and even headaches (known as a cervicogenic headache).
The suboccipital muscles are:
- Rectus capitus posterior major
- Rectus capitus posterior minor
- Obliquus capitus superior
- Obliquus capitus inferior
(Don’t worry about memorizing the names, I’ve just included them as some added detail.)
What’s important to know about these muscles is that they attach from the base of the skull to either the first or second cervical vertebrae (depending on the individual muscle).
The role of these muscles is to collectively provide extension and rotation for the upper neck; they don’t have any function when it comes to producing movement of the middle or lower neck.
In particular, the obliquus capitus inferior muscle attaches from the base of the skull onto the back of the second cervical vertebra.
This means that this muscle will be stretched with the upcoming SNAG movement. Stretching this muscle can help reduce the tension you feel in this region and may even help reduce a type of headache known as a cervicogenic headache.
Why general neck stretches won’t work
General neck stretches involving movement of your entire neck are unlikely to be relatively effective at explicitly targeting your upper neck. That’s not to say that these generalized stretches don’t have a time and place; instead, they just likely won’t get the job done for your upper neck. Here are the reasons why:
The first reason: Movement always takes the path of least resistance within the body. So, a stretching movement that moves the entire neck (i.e. all the neck joints collectively) will put the greatest amount of movement and stretch through the joints that are already moving adequately or have a more natural range of motion to begin with.
So, if you have stiff upper joints or suboccipital muscles and do a stretch for the entire cervical spine, the stiff joints and muscles will simply let the more mobile areas of the neck and spine produce the most movement.
The second reason: Depending on the type and extent of restriction in your upper neck, traditional and general neck stretches might not target the upper neck joints in the correct plane of movement.
This is especially true if you have some joint restriction (tightness) at the C1/2 joint in particular. Many people often try to target the tightness/stiffness they feel in this region by bending their neck to the side or forwards and backwards. Unfortunately, none of these movements are likely adequate to achieve the benefits you’re after.
The reason being is that this particular joint produces rotation; it doesn’t have much to offer when it comes to side bending or flexing and extending. So, to target this joint (just like with some of the suboccipital muscles), we need to produce specific directions of movement that are localized to this joint.
What you’ll need
To perform this ultra-handy little exercise/movement, all you’re going to need is a hand towel. There is, in fact, an actual Mulligan strap that you can purchase, which has been designed specifically for this situation; however, I find that a hand towel works nearly just as well.
How to perform the SNAG
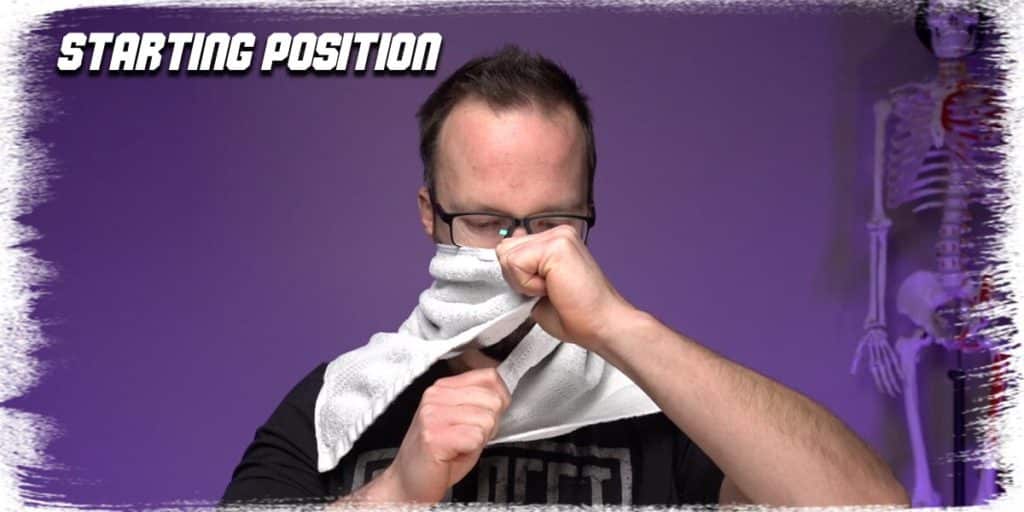
- Wrap the towel around the base of your skull with the top edge in contact with the bottom of your ear (this corresponds with the level of the cervical joints and muscles you’re about to stretch).
- Cross your arms so that your left arm grabs the front right corner of the towel and your right arm grabs the front left corner of the towel.
- If your left arm is crossed on top of your right arm, you will perform a left rotation for the next step; if your right arm is in front, you’ll perform a right rotation.
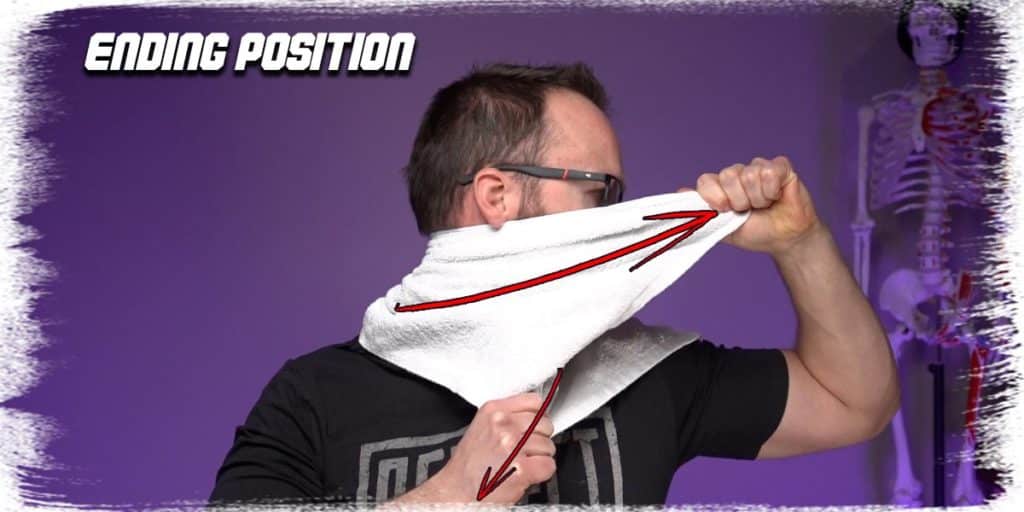
- Rotate your neck as far as you can (pain-free) while keeping gentle tension on the towel.
- Once you’ve rotated as far as you can using only your neck muscles, gently pull the towel in the direction that continues the rotation movement.
- Pull until you feel a gentle, mild stretch in your upper neck. Hold for a second or two, back off and repeat the movement.
- Perform as many repetitions as appropriate, then repeat the process by rotating your neck to the other side.
Pro tip: To get the most out of this movement, use your opposite arm to pull the towel down and away from the direction you are rotating towards. This will create relative rotation in the opposite direction for the joint on the other side of the neck.
Generally speaking, if you find this exercise helpful, you can perform 10-20 gentle repetitions every couple of hours for each direction you rotate. Again, keep it gentle so that you don’t wind up with any unnecessary discomfort, headaches, etc.
Bonus tip: Do THIS with your posture
One rather common reason individuals find themselves dealing with a tight upper neck is due to their daily posture. While “ideal posture” is indeed quite arbitrary, there are some general postural habits that tend to wreak havoc on the upper neck.
Arguably, the most common lousy postural habit is the one where we leave our head draping forward with our chin poking outwards and upwards. Take a look at anyone sitting down at a chair and you’ll see just how common this can be.
The result of this postural habit is known as upper-crossed syndrome, and it can cause some significant tightness at your C0/1 joint and your suboccipital muscles. No bueno. Learning how to avoid this position while sitting down can be extremely beneficial for the health of your neck (and upper body).
Addressing Upper-Crossed Syndrome
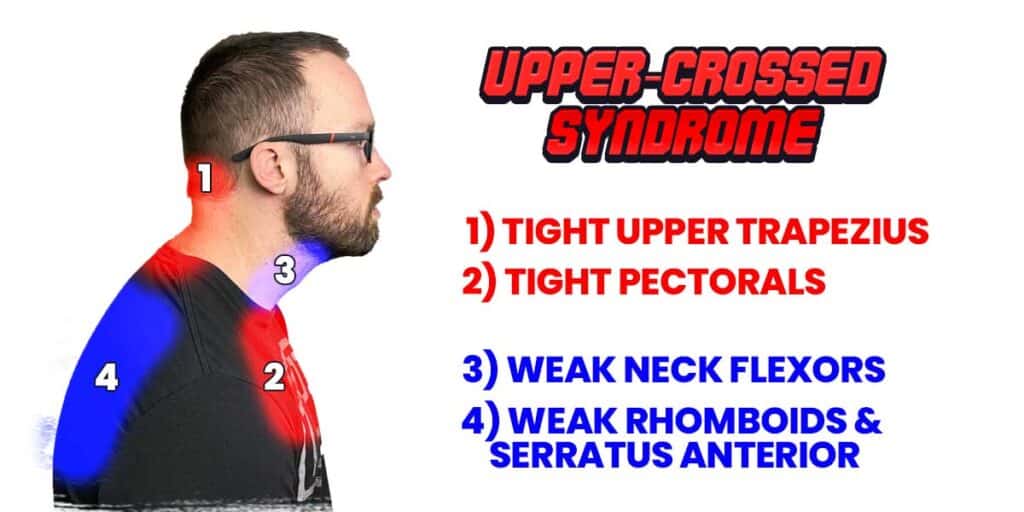
Upper crossed-syndrome refers to a particular pattern of muscle dysfunction where the upper neck muscles (suboccipital muscles) become chronically shortened and tight while the deep muscles on the front side of the neck become chronically lengthened out (and thus weak).
A similar pattern is also seen between the pectoral muscles and the upper back muscles. Have a look at the picture below to see the relationship more clearly.
If you have upper-crossed syndrome, or a tendency to slip into this posture when sitting, performing the “puppet string” position can help ensure you lengthen out your suboccipital muscles and reduce (or avoid) getting a chronically tight upper neck.
The “puppet string” position
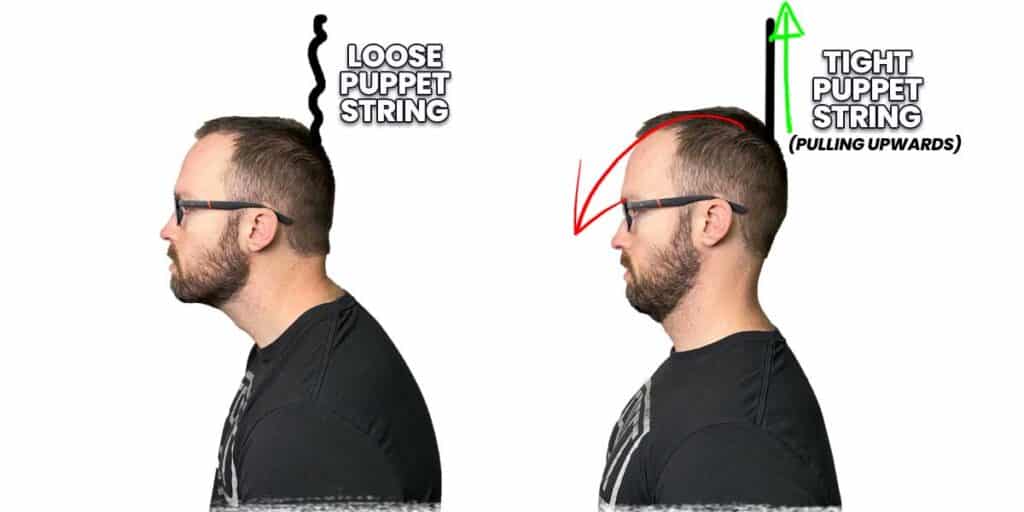
This is quite an easy position to achieve, so long as you can imagine that you are a puppet with a string attached at the back of the top of your head.
- From your usual sitting posture, pretend that there is a string attached at the back of the top of your head.
- Next, imagine a puppet master above you grabbing this string and pulling it directly upwards.
- As the string is pulled upwards, imagine your body following the tension of the string and the position that you would go into as a result.
- Your upper back should become straighter, and your chin will tilt downwards slightly (which will lengthen out your suboccipital muscles).
Hold this position for a few moments, or as long as you’d like before taking a break. You can repeat this for a number of repetitions (as many as you’d like) if you’d like to turn it into a postural exercise.
The more you practice this movement, the more your brain will remember to hold this more ideal posture when you sit down, which will help prevent the deleterious effects of upper-crossed syndrome from rearing their ugly head.
Final thoughts
If you’re going to target the upper neck joints and muscles, you’re going to need some rather specific movements in order to do so. There are, of course, plenty of other exercises and movements that you can do that will provide additional mobility and stretching to this area. But, if there were only one to do, especially when it comes to the upper joints, this one, in particular, is one of my go-to’s for many of the patients whom I treat in the clinic.

Hi! I’m Jim Wittstrom, PT, DPT, CSCS, Pn1.
I am a physical therapist who is passionate about all things pertaining to strength & conditioning, human movement, injury prevention and rehabilitation. I created StrengthResurgence.com in order to help others become stronger and healthier. I also love helping aspiring students and therapists fulfill their dreams of becoming successful in school and within their clinical PT practice. Thanks for checking out my site!
