There are plenty of blog articles on the internet talking about how to squat with bad knees, which I’m happy to see. Unfortunately, there’s not a lot of internet content on strategies for deadlifting with knee pain, be it in one knee or both.
But don’t sweat it; this article will provide the information and tips you’ll want to know for avoiding knee pain with deadlifts.
Deadlifting with bad knees requires understanding your knee condition, knowing how to perform effective warmups, and implementing specific training strategies, deadlift variations, and recovery strategies. It can take a bit of troubleshooting to get right, but it can be effective for many lifters.
So, if you’re willing to read through the contents of this article, not only will you learn some valuable anatomical and weightlifting information, but you’ll likely also gain added confidence in knowing how to keep deadlifting despite having a less-than-ideal knee (or two).
So… let’s get to it!
Related content:
As a quick reminder: I can’t cover everything within a single blog post. Your best bet is to always work with a qualified healthcare professional who can help determine the cause of your bad knee(s) and how best to proceed.
Learn about your knee pain

I say this in all of my blog posts because it’s the foundation for successful outcomes when avoiding, reducing, and eliminating pain:
The better you understand what’s causing your knee pain, the greater the likelihood of a successful outcome. In this case, the successful outcome is being able to deadlift effectively. You don’t need to know the hardcore details of knee anatomy here, but a basic understanding will make the following concepts and deadlifting strategies much more intuitive, which will increase your overall deadlifting outcomes.
I won’t go into the specifics here, but here’s what you’ll want to know and consider for common knee conditions and causes of knee pain (knowing the basic structures will be very helpful for the rest of the article).
Here’s a quick rundown on basic knee anatomy:
- The knee is a hinge joint, meaning it primarily works in a bending and straightening manner (it doesn’t tolerate a lot of twisting movement or side-to-side stress all that well).
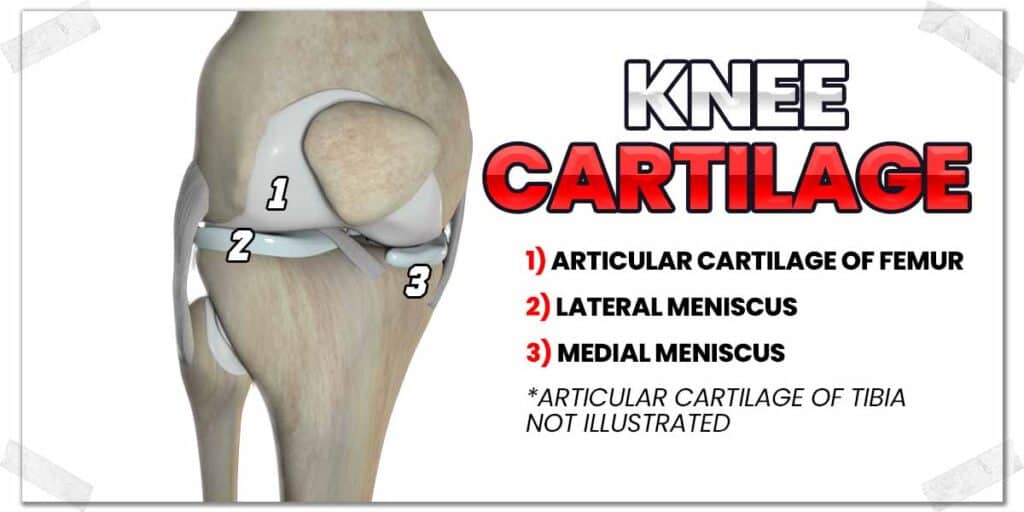
- The joint is formed by the bottom of the thigh bone (the femur) and the top of the shin bone (the tibia). The joint cartilage is on the bottom of the thigh bone and on top of the tibia, which provides a smooth, gliding surface for these bones to easily roll and glide along each other’s surfaces.
- The kneecap (known as the patella) sits in front of the joint and is encased within a thick, gristly tendon. The tendon above the kneecap is known as the common quadriceps tendon, while the tendon below the kneecap is called the patellar tendon.
- Between the knee joint are two pieces of cartilage known as the menisci (plural) or the meniscus (singular). These little cartilage discs act as shock absorbers for the knee. Sometimes, they can get torn, leading to various forms of knee pain with certain exercises, activities, and movements.
There’s your knee anatomy:101 crash course. Keep those structures in mind as you make your way through the rest of the article.
Common causes of knee pain
If you don’t know what’s causing your knee pain, this section will help serve as a primer for pointing you in the right direction for how you may want to consider working your knee back to optimal health or maintaining its current health as much as possible.
Please remember that I’m only listing the common causes of knee pain in men and women. Your best bet for a specific diagnosis of your knee condition is always through an in-person assessment through a qualified healthcare practitioner.
Osteoarthritis (OA) of the knee
Osteoarthritis is the most common joint disease experienced worldwide, with the knee being the most commonly affected joint.1 It is a condition involving the breakdown of cartilage on the ends of the femur and tibia, resulting in painful bone-on-bone contact. It affects men and women equally and becomes more common in the fifth and sixth decades of life.
Depending on their severity, arthritic joints typically do not appreciate heavy, impact-based movements (running, jumping, heavy squats, etc.). At the same time, an arthritic knee needs to stay moving as much as possible (in non-irritating ways).
When an arthritic joint sits still, it receives minimal synovial fluid exchange around the joint. Synovial fluid is the lubricating joint fluid that helps joints move and glide. It’s rich in oxygen and other substances that articular cartilage requires to stay healthy. Physical movement helps push this fluid around the joint, ensuring the cartilage has greater access to what it requires to stay healthy.
Arthritic joints can often tolerate physical exercise (such as deadlifts) much better if the following strategies in this article are followed!
Patellofemoral pain syndrome (PFPS)
Patellofemoral pain syndrome is an umbrella term for pain arising around the knee. It can arise for various reasons, such as faulty knee mechanics, muscular imbalances of the quadriceps muscles, overuse of the joint from repetitive activities, and poor patellar tracking along the joint.
Thankfully, PFPS has quite good rehabilitation outcomes once the underlying cause(s) are identified.
Patellar tendinopathy
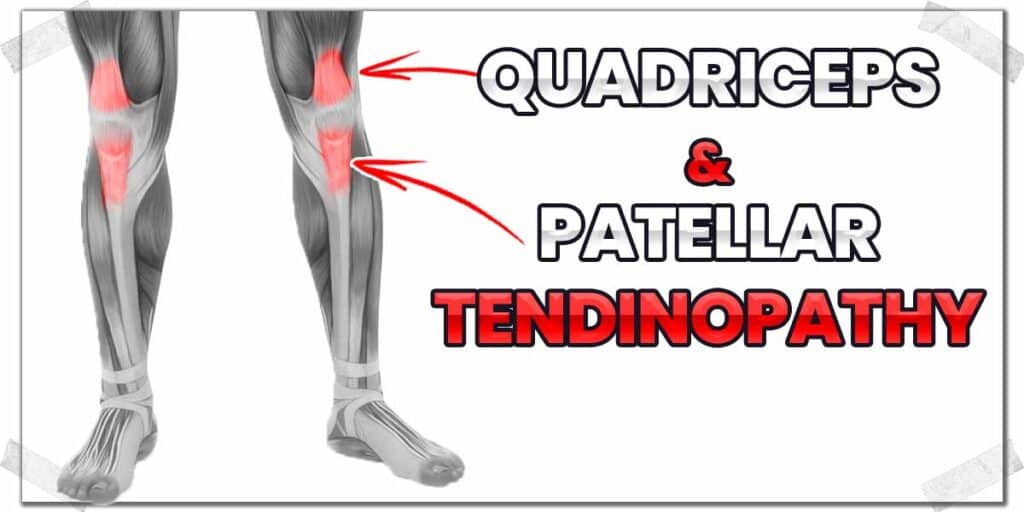
The patellar tendon is prone to becoming overworked, irritated, or otherwise unhealthy. When this occurs, it usually leads to a condition known as tendinopathy (an umbrella term for an unhealthy tendon). The patellar tendon is one of the most common areas in the body affected by tendinopathy.2
Despite tendon pain being very common, thankfully tendinopathy typically responds well to conservative measures, including loading (resistance exercise).
IT band syndrome
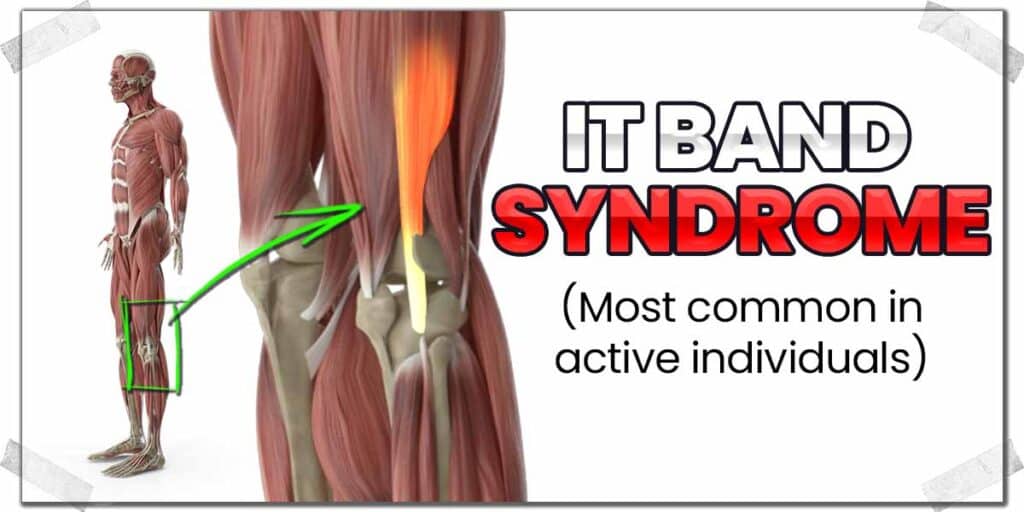
IT band syndrome refers to a painful condition affecting the outside (lateral) region of the knee. The condition arises when the portion of the IT band crossing over the knee joint no longer painlessly glides over the top of the femoral condyle and instead becomes irritated when this occurs. It’s much more common in athletic populations, particularly in runners.3
Optimize your warmup
An effective warmup before a resistance training session is a good idea for pretty much everyone, but it’s essential for anyone dealing with an unhealthy or problematic knee. The key here is an effective warmup.
While there are numerous ways such a warmup can be done, the concepts of an effective warmup are what really matter here. Once you can understand and appreciate the concepts, you can individualize and tweak all of the following components to suit your needs, abilities, and overall situation.
Let’s look at the three stages or steps to run through to ensure your knees are as ready to go as possible before your deadlift workout.
Step 1: Increasing blood flow into and around your knee
This process should take between 5 to 10 minutes.
The purpose of increasing the rate and amount of blood flow throughout your knee is to increase the temperature of the knee’s associated muscles and tendons. This helps the knee loosen up and reduces the discomfort that arises when tissues are stiff.
With a sore or painful knee, the best way to increase blood flow to your knee is through non-impact aerobic activity, whereby you continually move your knee while keeping your heart rate elevated.
The strategy here is to find a repetitive movement, such as riding a stationary bike, using an elliptical machine, a rowing machine, etc., and to perform five to ten minutes of movement.
Use an intensity that has you break a light sweat by the end, and make sure that it doesn’t cause any pain or worsening of knee discomfort in the process.
By the end of this continual dynamic movement, you should feel that your knee (and the rest of your body) is a bit warmer and further prepared for more activity.
Pro tip: You can consider wearing a neoprene knee sleeve during this process, which will assist with increasing the warmth of your knee.
Step 2: Find the right dynamic movements for your knee and lower body
Whole-body aerobic activity (step 1) is the generalized preparation for adequately warming up your sore or problematic knee(s). Next, we need to get a bit more specific for the knee itself.
The best way to do this is to perform a series of dynamic movements that will further prepare (loosen, activate, and engage) your knees for your deadlifts and other resistance-based exercises.
A dynamic movement (sometimes called an active dynamic movement) involves performing physical movement that takes a joint and its associated muscles through ranges of motion to specifically prepare it for your upcoming activity.
Related content:
The more the knee joint, muscles, and tendons are specifically prepared for your deadlifting, the more tolerant (less painful) your knee will be during and after your training session. So, not only will your knee perform better during your deadlifts, but it will also decrease the risk of irritation, injury, or worsening of your knee condition.
The type and extent of dynamic exercises that will be most appropriate for your knees will depend on many individual factors.
This is where you’ll need to put a bit of time and effort into finding which specific movements will be best tolerated by your knee or knees.
However, as a general overview, here’s what you’ll want to consider:
- Perform movements that do not cause pain in your knee. Mild discomfort (which is different from pain) is often acceptable, so long as it’s mild or less than mild and does not worsen as you continue on with your movements.
- Keep your dynamic warmup movements slow and controlled. With a bad knee or two, there’s no need to perform fast, ballistic movements, particularly if the main goal is to prepare your knees and body for deadlifting.
- Start each dynamic movement with a smaller range of motion and gradually work into larger ranges of motion as your knee continues to warm up. Work into as large of a range of motion as you’re physically and mentally comfortable with.
- A series of 3-5 specific movements is likely a decent starting point, but you can certainly perform more or fewer exercises based on your needs.
- Consider performing 10-30 repetitions for each individual dynamic knee movement. Again, there’s room to play around with these numbers based on your specific needs.
The whole process of performing your series of dynamic knee movements should take around five minutes.
By the end of this series of movements, your knee should feel ready for the much more exciting third step of this whole dynamic warmup process.
Step 3: Grooving the deadlift pattern
“Grooving the pattern” or “greasing the chain” refers to performing the specific movement pattern of an exercise (in this case, the deadlift) without any weight or resistance aside from the weight of the barbell itself.
It’s often referred to as a “working warmup set” and is highly beneficial for further preparing the knees, hips, back, and the rest of the body for the upcoming exercise. In case you haven’t picked up on it at this point, the pattern from step 1 through step 3 has progressively become more specific to the deadlift exercise.
Why is it important to “grease the chain”? Because it will help further prepare your knees for the specific demands they’ll need to endure when loaded against weight, and it will simultaneously allow you to interpret how your knee feels before loading the barbell with weight.
You’ll want to know which type of deadlift is best for your knee(s) so that you can perform the movement for that specific deadlift variation. To learn more about deadlift variations that may be best for your knee(s), check out the section after the following section.
There’s no hard and fast rule regarding how many repetitions or sets you should perform when grooving your deadlift pattern. I will personally perform fifteen to twenty repetitions for two sets before loading up with a bit of weight after that.
Consider using neoprene knee sleeves

As briefly mentioned in the previous section, wearing a neoprene knee sleeve is a tactic many lifters (both with good and bad knees) implement when deadlifting, squatting, and performing lower-body workouts.
Neoprene is a synthetic rubber commonly used for orthopedic purposes, particularly for various body parts (such as the knee).
The purpose of neoprene knee sleeves isn’t to provide a structural bracing of the knee; it’s to help provide better proprioception (positional awareness) of the knee. This is achieved by the sleeve providing a mild compression around the joint when worn, allowing your brain to better perceive the knee movements and positioning taking place.
Many lifters, including myself, truly appreciate this mild compression during our lifting sessions and feel they are helpful to wear for lower-body weightlifting exercises, such as deadlifts.
As an added bonus, neoprene knee sleeves are also great at keeping heat underneath the sleeve, increasing the knee’s overall warmth. It’s actually rather remarkable just how much added warmth they provide. This added heat helps decrease fluid viscosity underneath the skin and helps ensure higher blood flow within the region.
There are plenty of types of neoprene knee sleeves that lifters wear, so it may feel a bit overwhelming to know which type or brand to purchase. I personally wouldn’t fret too much over the issue.
I’ve used different brands over the years, but like the majority of other lifters, Rheband knee sleeves have always been my favorite.
Always use Olympic plates on the barbell
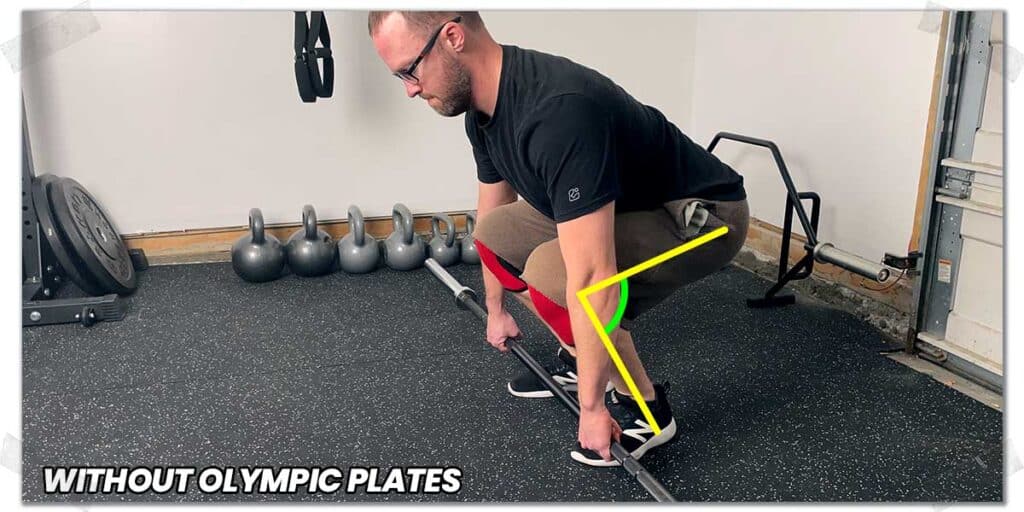
Olympic plates may sound intimidating, but there’s nothing to be afraid of with this name. Olympic plates refer to a standard plate diameter, regardless of its weight (their diameter is typically around 17.75″). So, with Olympic plates, whether the plate weighs 45 lbs. or 10 lbs., their diameter is the same.
Using Olympic-sized plates for your deadlift (whenever possible) is critical since it ensures you don’t lower the bar too close to the ground. When dealing with bad knees, lowering too close to the ground (even if it’s just to pick up or set down the weight) requires a much larger range of motion, which can be taxing on the knees, especially when doing so against resistance.
So, if you have access to them, opt for always having at least one Olympic plate on each end of the bar. That way, even if you put smaller diameter weights on the bar, you’ll avoid using an excessively large range of motion when deadlifting, which can save your knees from added aches and pains.
Use THIS deadlift variation (and avoid others)
This may just be the secret sauce to helping you perform deadlifts without blowing up your knees in the process.
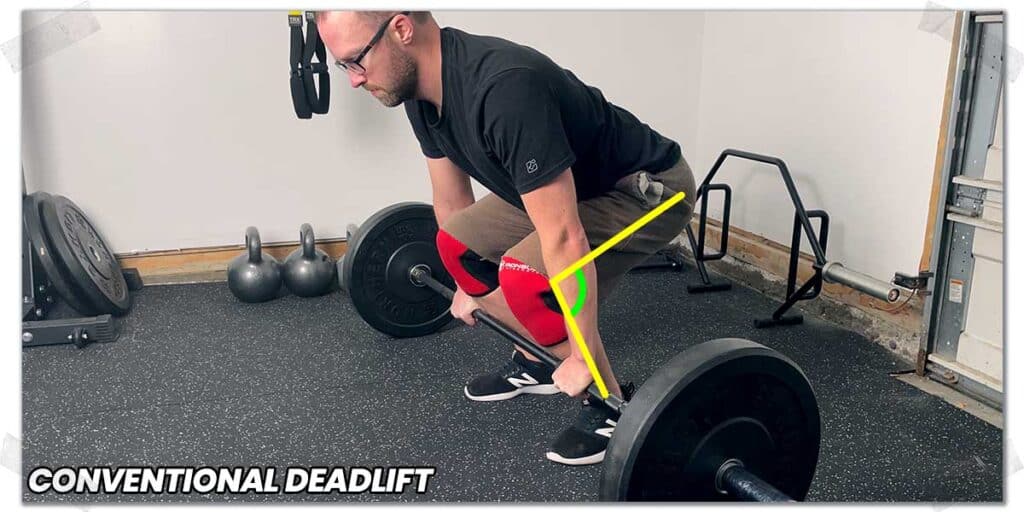
Some deadlifts, such as the Romanian deadlift (often shortened to RDLs), require less knee movement during the lift, while other variations, such as the conventional deadlift and trap bar deadlifts, require more knee movement and quadriceps muscle recruitment, which may be irritating or painful for certain knee conditions.
Related article: Straps vs. Mixed Grip When Deadlifting (Pros & Cons of Each)
If your knee becomes irritated or painful with the conventional deadlift (which uses a moderate amount of knee movement), it may be worth trying the Romanian deadlift (often called the stiff-legged deadlift) since it requires less knee motion.
The Romanian deadlift still challenges the same movement pattern and sets of muscles throughout the body, albeit with a slightly different emphasis on which muscles work harder and which work less.
The most noteworthy difference involves less quadriceps muscle activation and greater hamstring and lower back muscle activation.
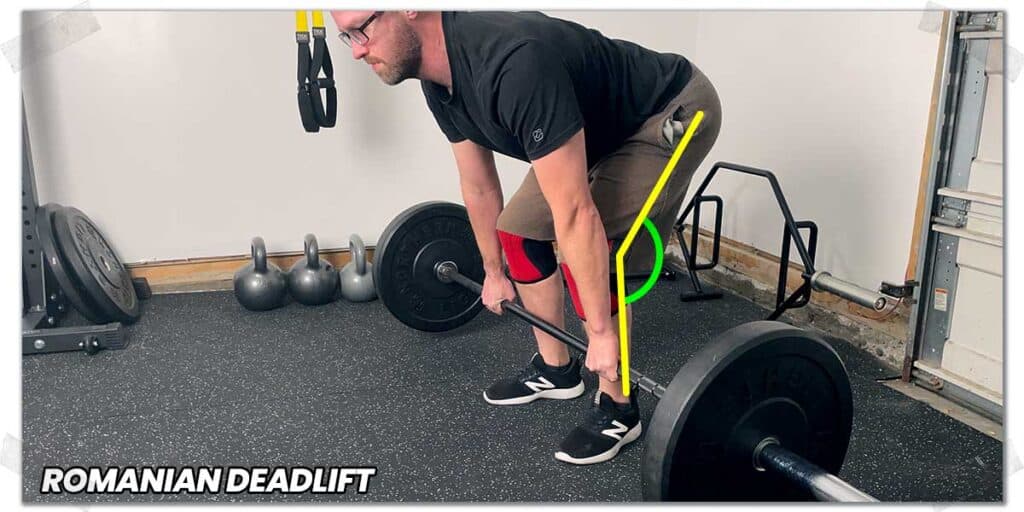
Performing the Romanian deadlift
The Romanian deadlift involves the same overall starting position as the conventional deadlift (stance, grip width, etc.). Once the bar is raised off the floor, however, the movement pattern slightly changes for the rest of the repetitions.
Instead of lowering the weight all the way back to the floor, you only lower it as far as possible while:
- Not rounding your lower back (it’s easy to tweak and injure your lower back if you don’t keep it straight).
- Maintaining nearly straight (but not locked out!) knees at all times. There should be no physical movement of your knees when lowering the weight or pulling yourself back to the upright position.
You’ll likely feel a greater stretch or sense of effort running through your hamstrings and lower back muscles, which is not a bad thing at all; strengthening these muscles can help reduce all sorts of aches, pains, and injuries to the backside of your body.
Pro tip: You can perform the Romanian deadlift one leg at a time (known as single-leg Romanian deadlifts). This can be a great variation if you want to focus on one leg at a time. You can perform them either with a barbell or with dumbbells.
Consider avoiding trap bar (hex bar) deadlifts
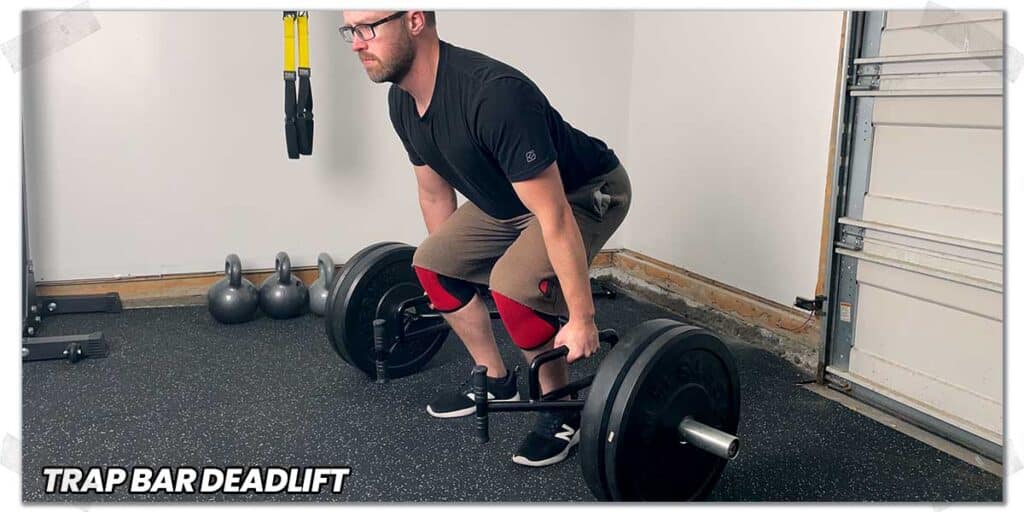
Depending on the type of knee pain or condition you’re experiencing, the trap bar deadlift may be worth avoiding, at least for the time being.
To be clear: the trap bar deadlift has numerous benefits in plenty of other situations; it makes deadlift technique easier, can be safer on the lower back, etc. But if your knee pain is due to poor health in your quadriceps tendon or patellar tendon, they have the potential to make your knee pain worse.
Why can it make knee pain worse?
Essentially, when lifting from inside the trap bar, the quadriceps muscles (which straighten the knee) are more involved with the lift than the conventional deadlift due to the center of gravity being directly in line with the lifter’s body.
It’s worth mentioning that there’s room for experimenting with the trap bar deadlift, as it may not worsen or irritate your knee pain. So long as you’re aware of its potential to further irritate certain knee conditions, I feel I’ve done my job.
Please note: the caveat here is that trap bar deadlifts can also be very effective for remedying this same issue if your loading parameters and execution are on point. However, for the sake of this article, my goal is to raise awareness of the potential for trap bar deadlifts to overload (overstimulate) these already unhealthy and painful knee tendons.
Pull from blocks or from the rack
If Romanian deadlifts aren’t your thing, or even if you can’t perform the first repetition from pulling the barbell off the floor, using blocks or squat rack pins can be a highly effective strategy to implement for any of your deadlifting pursuits.
The strategy here involves having the barbell (and any weight attached to it) always rest higher off the floor so that your knees don’t have to endure larger ranges of motion. While it’s always preferable to use larger ranges of motion for most exercises, sometimes it’s just not a viable option.
The key to this strategy is to set your blocks or pins as low as possible (so that you retain as much range as possible) without experiencing any knee pain.
This strategy works particularly well for those who only have knee pain at the bottom range of the deadlift.
Benefits of pulling from blocks or pins
The benefit of pulling from blocks or pins is that it can often be performed with heavier loads (more weight on the barbell) since the overall range of motion is shorter (with less knee movement).
This means that while you might have to sacrifice some range of motion, you can likely “offset” this by adding some additional weight to the bar.
Drawbacks of pulling from blocks or pins
The main drawback of pulling from blocks or pins is the shortened range of deadlift motion, which can limit some of the effectiveness of the exercise. When it comes to getting stronger, getting stronger through large ranges of motion is preferable to ranges that are shorter.
Not only does this reduce the likelihood of injury (since the muscles are stronger throughout the entire movement), but training through a large range of motion can profoundly improve joint mobility and overall flexibility.
Thankfully, if you are keen on training a large range of motion with heavier loads but your knees can’t keep up, the strategy below might be the perfect answer.
Try increasing your time under tension with the deadlift
You don’t have to go excessively heavy to make your gains when it comes to increasing your muscular strength and size from deadlifts. This should be good news since heavy lifting typically makes sore, painful knees feel worse.
Thankfully, there is a way to circumvent this issue, allowing you to reap the rewards of your deadlifting but without punishing your knees in the process.
The strategy involves deadlifting with lighter weight but performing each deadlift very slowly. Slower repetitions take longer to complete, meaning the deadlifting muscles are under a continual state of tension (exerting effort) for a longer duration of time.
The longer muscles must remain under tension against a resistance, the more fatigued (tired) they become. The more fatigued a muscle becomes, the more it responds though becoming stronger.
There is a surprising amount of scientific evidence to back this up, so don’t dismiss this training tactic.
With TUT training, exercises are performed at a very slow tempo, equating to a longer duration of time where the muscles must work (under tension) against resistance. This can tire out (fatigue) muscles quite extensively, all without ever lifting heavy weight in the process.
The heavier a resistance load is, the less time the muscles can remain under tension to move the load. So, with a lighter weight, muscles can remain under tension for a longer period of time. It’s a challenging training method but can work quite well for lifters with joints and muscles that don’t tolerate heavier loads.
How to perform time under tension (TUT) training
Your best bet for TUT training is to use a load of approximately 50% of your one-repetition maximum (1RM). Traditional strength training usually requires a load of around 65% 1RM to elicit muscular size and strength responses.
With your deadlifts, try lifting at a 5:1:5 tempo. This means that you’ll take five seconds to pull the weight from the floor to the upright position. You’ll then take a one-second pause at the top of the movement and then another five seconds to lower the weight back to the floor.
Trust me when I say you’ll want to go light with these deadlifts; banging out ten or twelve repetitions at this speed can be exhausting, and it takes a ton of mental strength to keep the movement slow (the more tired you become, the quicker you’ll want to move the weight).
Try this for two or three sets (with plenty of rest time between each), and you’ll very likely be surprised at how exhausting it can be to deadlift with lighter weight.
Optimize your cool down and recovery
Train hard. Recover harder.
Think about it for a second: if you’re going to put all this effort into looking after your knee for deadlifting, why would you want to skip out on ensuring you’re optimizing your post-workout recovery?
There’s a whole world to unpack here, and if you want the meat and potatoes of enhancing your knee and leg recovery after deadlifting, check out my in-depth article: How to Recover Faster After Leg Day.
If you’re not into reading another article, here are some key knee recovery points to be aware of:
- Take your cool down seriously. Whether it’s a lactate flush or some IASTM, your muscles and joints will thank you.
- Keep your protein consumption elevated – it’s hard for your body to keep itself strong when it doesn’t have the amino acids needed for tissue regeneration.
Final thoughts
If you’ve got a bad knee, it may still be possible to perform deadlifts without irritating or further hurting your knee. It will take some effort, but plenty of lifters with a bad knee or two have found ways to train the deadlift using the right strategies and modifications tailored to their needs and abilities.
Start by making an effort to ensure you know what’s going on with your knee. From there, take the time to explore your warmup options, deadlift variations, training parameters and recovery techniques. These steps are merely a starting point for exploring how to deadlift with a painful knee, but they can be powerful first steps to make.
Train smart. You’ve got this.
Frequently Asked Questions
To make this article as helpful as possible, I’ve included a few brief answers to some commonly asked questions that individuals often have with deadlifting and knee health.
References:
2. Millar NL, Silbernagel KG, Thorborg K, et al. Tendinopathy. Nat Rev Dis Primer. 2021;7(1):1-21.

Hi! I’m Jim Wittstrom, PT, DPT, CSCS, Pn1.
I am a physical therapist who is passionate about all things pertaining to strength & conditioning, human movement, injury prevention and rehabilitation. I created StrengthResurgence.com in order to help others become stronger and healthier. I also love helping aspiring students and therapists fulfill their dreams of becoming successful in school and within their clinical PT practice. Thanks for checking out my site!